Image Map

Monday, October 31, 2016

Costume Wall Display: an invitation to play

Over the last few months I've shared bits and pieces of some updates I've recently made to what is now the play room down in our finished basement. Today I wanted to show you a quick update that I did to store and organize all of the dress up costumes that the girls have. I love how playful it looks, but I love how accessible it is for the girls, and how much the system itself encourages to use the clothes, even more!


The girls' dress up clothes have had various homes over the years. My goal has always to make sure the girls can reach them by themselves, but they haven't always been out in the most prominent places where they can inspire a new spark of imagination- mostly they've been hanging in a corner of their closet. Now that the girls are 4 (almost 5), they are pretending in their play ALL THE TIME! It is one of the best things about having two 4-year-olds around. I knew I needed to find a way to make the costumes more visible somewhere in the playroom so that they would get more use.

Enter some simple wall hooks from Home Depot! If I were fancy, I would have screwed the hooks into a piece of wood and then attached the wood to the wall. Unfortunately I am not that fancy and couldn't be bothered with the extra step. So instead I just screwed the hooks right into the wall! 


Now instead of hanging sideways, where you can barely tell what is there because each costume is sandwiched between the others, they hang longways, so you can see each costume separately. PLUS it adds some great color and fun to the wall- no need for artwork when you've got a Wall of Costumes! :) The girls have definitely been using them more now that they are right there with their other toys and prominently displayed. Hopefully organizing them this way will encourage more imaginative play for years to come!

If you're interested in seeing what else I've been putting together in the playroom, you can check out these blog posts:


Want more? Subscribe right here to the Organized Chaos newsletter and get ideas and resources for home and school sent straight to your inbox.

Sunday, October 30, 2016

October Favorites 2016

Can you believe October is coming to an end? I'm here to chat with you about some things I loved this past month- I'd love to hear what you've been up to in the comments! Pour yourself a nice cup of tea, take a deep breath, and let's take a minute to reflect on the wonderful things we enjoyed in October :)


October seems to be a popular month to get sick in my house, and this year was no exception. I was sick (and still am) all month with varying degrees of bronchitis/ chest congestion, and one of my daughters has been keeping pace with me most of the month as well. Being congested for weeks on end definitely made my already-loved homemade chai tea an even bigger hit this month! Not only is it soothing for my throat (and spirit) to drink, but when it's simmering on the stove it makes a perfect vaporizer and scent dispenser all in one! My daughter and I stood over that pot many a time and I LOVED it. Chai tea is not as hard to make at home as you might think- I shared my recipe recently so go check it out and try it for yourself if you're interested:


I found these fun, glittery fall leaves at the Dollar Tree recently and, as suspected, my students loved them! I used them to show melodic contour with a song about fall leaves and it was a hit! Those little things that add a little sparkle to the lesson can make all the difference in attention and retention, especially at this time of year (find the songs I used and other lesson ideas in these curriculum sets). The Dollar Tree seems to be really stepping up its game- at least the one near me- and I've been having pretty good luck with little seasonal finds like these. Definitely a keeper!


I finally started teaching ukuleles for the first time EVER this month and it was so exciting! I got ukuleles through a donorschoose project funded this past summer, and I'm using them with my 6th graders as part of the chord progression composition project I have been doing with them each year. So far we are all loving it! 


I found some wonderful music education blog posts this month! Take a few minutes to read through them- you'll find some great ideas you'll want to save, I guarantee :)


I hope you've all had a wonderful month! What were your favorite things this October? Let's here them in the comments! Want more? Subscribe right here to the Organized Chaos newsletter for more ideas and resources for home and school.

Tuesday, October 25, 2016

Music Note Races: the fun way to practice dictation

I've recently become slightly obsessed with a game I'm calling Music Note Races (and my students love it just as much as I do). There's nothing revolutionary about the concept but it has been so successful with all of my students from 1st grade through 6th grade that I had to share! If you're looking for a new way to practice music dictation, whether you're focusing on rhythms, letter names, solfege, or any other concept, this may be just what you're looking for!


Practicing dictation is an important part of my music curriculum. In the youngest grades I am especially focused on getting them to notate the solfege notes sol and mi on a 3- or 5-line staff and rhythms with quarter notes and rests and barred eighth notes. By the time they are in 6th grade, we are practicing notating in bass clef. The problem is that all of these skills require repetition to develop fluency, but traditional drilling is just too monotonous for all of us!

The basic idea of the Music Note Race is to split the class up into small teams (3-4 students in a group seems to work best) and have teams race to correctly dictate the notes that you give them. I have been using dry erase boards that already have the 5-line staff on them- if you don't have those, you can print out (or even handwrite) a large 5-line staff on a piece of paper and laminate it to make your own dry erase music staff.

The rules: I have the students on each team either sit next to each other in rows of chairs or line up behind each other sitting on the floor, with the person at the front or far end of each team holding the board, marker, and eraser. I say the pattern they need to write, and the student at the board writes it down and holds up their answer. If it is correct I grab their board to show the class. If it is wrong (and nobody else has gotten the correct answer yet) I tell them to try again. The teammates are allowed to help verbally but they cannot touch the board, marker, or eraser. This keeps everyone engaged and practicing while giving everyone the opportunity to practice writing. After each round I give the winning team a point and they pass the board/marker/eraser to the next person on their team. I will usually try to wait until most teams have made their best attempt at finishing before announcing the winner- usually they are so engrossed in trying to write it down that they don't see that I'm holding the winning board until they look up after finishing their own answer. This way they don't give up as soon as someone else gets the correct answer before them!


Some examples: I use this activity for a variety of musical concepts. For treble and bass clef letter names, I call out a word that can be spelled with the music note letters and have them "spell" the word with whole notes (pictured above). For solfege, I sing (and sign) a 2-4 note pattern and have them wrote it down (we establish where the notes will be on the staff beforehand). For rhythms, I clap and/or speak a 4-beat rhythm pattern and have them write it (in the blank space at the bottom of the board, or I also have mini chalkboards that I pull out for when I don't need a 5-line staff).

Change it up: Even with the game aspect of this activity, it will still get old if you keep repeating it the same way every class. For those classes that have needed some additional practice (which for me has been 1st grade, learning to write solfege patterns for the first time, 3rd grade, learning treble clef letter names, and 5th grade, learning bass clef for the first time), I've found that changing it up a little each time keeps it fresh. Instead of dry erase boards, I've also used small chalk boards with chalk. I've also had each team race up to the large whiteboard with a marker to write it on the big board instead of each having their own. With the younger students, I've also had them dictate using manipulatives (read more about what I use for this and where I get them here). Mixing up the teams, adding another beat to each example, or changing how I present the examples (playing a rhythm on an instrument instead of clapping, etc) are all other easy ways to keep things interesting.

The students love this game. It is just enough competition to get everyone excited and motivated but not too much pressure for the kids who get stressed by the feeling of losing. It's also an easy way to help students understand how to help each other without taking over- they have to help their teammates know what to write without actually writing it for them. What are your favorite ways to make music dictation more exciting for students? Share your ideas in the comments below!

Want more? Subscribe to the Organized Chaos newsletter right here to get ideas and resources sent straight to your inbox!

Monday, October 24, 2016

Chai Tea Recipe

Fall has started to settle in around here- the leaves are gorgeous! One of my favorite things to do in the fall is make chai tea. Not only is it delicious to drink when it's cold outside, but it soothes the inevitable sore throat I get AND makes the entire house smell like heaven! The great thing about making your own chai at home is that you can make it exactly the way you want it. You can take my recipe and, using the same method, tweak the ingredients to your taste.


The first thing to note is that chai tea is kindof like chili in the States- everyone has their own recipe that they love, and there are a million different ways to make it. So please don't take the ingredients in my recipe as a hard-and-fast rule- mix and match the flavors you love and experiment until you find the blend you love!

The ingredients I use in my chai are: cinnamon, cardamom, ginger, and black tea (I add sugar and milk later too). Other ingredients commonly included in chai are star anise, cloves, and black pepper. I like to use decaf black tea so that I can drink it any time of day (I always make a big batch and keep it in the fridge for later)- I just get basic tea at the grocery store.


I've found that the key to making chai is using whole spices. I used to use powdered versions of all of these spices and it just wasn't the same. I've found whole cardamom pods and cinnamon sticks are cheapest at my local Indian food market, but most health food stores (Whole Foods etc) have them as well. The nice thing is a little goes a long way, so one bag will last you a long while. And I guarantee whole cardamom anywhere is cheaper than ground- have you seen how expensive a bottle of ground cardamom is?!? It boggles my mind.... Fresh ginger is easy to find at almost any grocery store, and I keep what I don't use in the freezer.

To get a nice, spicy, full-flavored chai, the spices need time to simmer, I start off by cracking open the cardamom pods (you don't have to but you'll get a lot more flavor this way) and shaving off some pieces of ginger with a knife, and putting all 3 spices into a pot full of water, then I bring it to a boil over high heat (for a medium-sized pot, I tend to use 3-4 cinnamon sticks, a handful of cardamom, and 4-5 pieces of ginger). 


Once the water is boiling, add the tea bags. I usually use around 6 tea bags, since I'm making a huge batch. If you want a stronger tea flavor, boiling longer is NOT the answer- you want to add more tea bags. Reduce to medium heat to keep it at a slow boil, and steep the tea bags with the spices for the number of minutes it says on the tea bags- usually somewhere around 5 minutes (if you leave the tea bags in too long it will turn bitter, so set a timer for this part!). If your tea bags have strings with little paper tags on them, cut off the tags before putting them in the pot. That way you don't have to worry about them bubbling around the pot and getting paper in your chai.


Remove the tea bags from the pot and reduce to low heat while the spices continue to simmer. If you want to prevent the tea from reducing too much, cover the pot. If you, like me, want your house to smell like heaven, leave it uncovered (trust me, it's worth it). At this point, the longer you simmer, the stronger the spices will be. Taste it every so often until it has the spiciness level you're looking for (and keep in mind that the flavor will get a little bit stronger if you keep it for later in the fridge, and the flavor will obviously get weaker if you add sweetener or milk later). 

Once your spice blend is to your liking, turn off the heat. Pour out the tea over a strainer into a bowl (or sealed container if you're keeping extra in the fridge). Don't throw away the spices! I leave them in the strainer for a while to let most of the water drip off, then put it all in a small dish in my living room for some amazing potpourri! I also reuse the cinnamon sticks in my next batch. They'll last through many rounds of boiling.

I like to add my sweetener to each cup so that if guests want some they can adjust it to their taste, but if you want to add sweetener to the whole batch now is the time: I use sugar (brown or white), but honey or other sweeteners will work too. I'll warn you- if you're used to American coffeeshop chai, you're probably going to need a LOT of sweetener to get the same sweetness.You can also counteract a batch that got too spicy with some extra sweetener. 

If you're saving some for later, definitely leave the milk out until you're ready to drink. I use whole milk and use a frother to make it more of a "latte" but that is really not necessary for a good chai- just get it heated through in a kettle or microwave. Sit down with your steaming cup of chai and breath in the best of fall! 

Want more? Subscribe here to the Organized Chaos newsletter and get ideas and resources for home and school sent straight to your inbox!

Tuesday, October 18, 2016

Organizing Your Teacher Closet on a Budget (part 1: small items)

How many teachers have impeccably clean, organized, streamlined classrooms, but have mountains of disorganized junk just behind their closet doors? It's hard to keep a classroom closet organized. As elementary teachers we have so many little things that we need to have on hand but don't use year-round, and we often need to get them out of sight quickly and end up just throwing things in the closet without having time to figure out where it goes. I've recently come up with a few new tricks for organizing my materials in my classroom closet that have helped me maintain the organization through the last-minute pulling stuff out and putting stuff away, and I'm really excited about how well they're working (and how easy they were to implement)! Today I want to share what I'm using to help organize all of those small items- manipulatives, game pieces, etc- that need to be organized and easily accessible in my closet.

I have a few large shelving units in my closet. I'm grateful to have the storage but big shelves are definitely not generally conducive to storing the types of things I need to keep in my closet, which are mostly small items that will quickly get buried and mixed up on a large shelf. They key with organizing small items in larger spaces, whether that's a drawer, counter space, table, or shelf, is to get smaller containers. The problem is that we as teachers need LOTS of containers if we're actually going to organize all the little things we have, and that can get expensive. Here are some of the cheap items I found that are working perfectly for my closet!


The best things to use, if you can find them cheaply, are drawer organizers. I found mine on super-clearance at Marshall's- any discount store with home items, or dollar stores, or good places to keep an eye out for these (mine were $2 for each set so I spent a total of $6). The nice thing is you get lots of small bins in one, usually in different sizes, and often you can arrange them in whatever configuration best fits your space. I am using these for my composition manipulatives (like lego blocks and mini erasers), solfege stickers, and game pieces for some of the games I use for centers


Another great solution that I just recently came up with is the mini accordion folder that I got at the Dollar Tree (I've seen them at other stores like Walmart as well for the same price). I saw this rainbow one last year and bought it, knowing I would eventually find some use for it (although I didn't expect to wait a whole year to come up with a great way to use it...). I've now organized all of the small card decks that I use for centers and class activities, especially to review note names and instruments (most of which I made myself). I also have decks of cards that I got at the Target dollar spot that show musical instruments and flags from around the world- I use these for simple sorting activities in centers and small groups. I had previously had them stacked up in piles on the shelf, and I always ended up knocking over the piles and getting the decks all mixed up with each other. Now I can quickly slip them into their own slots and pull out just the ones I need without getting them mixed up! 


I bought these dip trays at the Dollar Tree to use for sorting activities (like the ones using the decks or cards I mentioned before, where students sort the instrument cards into families of instruments, or sort the country flags into continents etc). When I use them for sorting, I write the category names on the different compartments with wet erase marker and then wipe the off afterwards so I can reuse them. I recently, however, figured out another great use for them when they are sitting in my closet: sorting individual sets of manipulatives! When I am going to be using composition manipulatives in class, I usually need to have several sets of the same items so individual students or small groups can each have the same set of materials to use. When I'm getting ready for a class using them, I pre-sort the items in the dip tray so that I don't have to dig through the pile of lego blocks searching for one more pink one while I'm teaching. It's also great because I can just bring out the tray for that class and put them back in the closet, still sorted, until the next class when I'm using them again. Once we're done with that set of lessons, I can dump them back into the small drawer organizer with all of the legos so I can quickly find them again next time.


I've been very happy with how well my system is working so far this year, and I hope you've found some inspiration to help you cheaply and easily organize your own classroom materials. If you're curious about the items that I mentioned, check out the other blog posts that I've linked in the descriptions above- I love having these materials to use and they are also cheap and easy to get! :) Have your own organization tricks to share for keeping your classroom closet organized? Let's hear them in the comments!

Want more? Subscribe here to the Organized Chaos newsletter to get ideas and resources for organization, lesson plans, and so much more sent straight to your inbox!

Monday, October 17, 2016

Managing All Your Kids' Artwork

If you have young children at home, you know that there seems to be an endless supply of artwork floating around, and no matter how many times you organize and purge more appears almost instantly! I always struggle with staying on top of the mountain of drawings because I want to appreciate the pictures my girls are making, and I want to make sure I'm saving a few choice pieces from each stage of their lives to look back on later, but the sheer quantity makes it difficult to find the time to sort through everything to find the ones to keep. Plus it can often be really hard to throw away something made lovingly by a 4-year-old! Although I won't say I never have piles of pictures all over my house anymore, I've come up with a system for managing all of the artwork at our house that has been helping me to keep everything more manageable.


To be honest, I don't really have time to think about what to do with all those pictures during the week- I empty out any pictures that they make at school and make one big pile for each of my daughters with all of their artwork (I do go through and take care of any paperwork that comes home on a daily basis though). Once a week (sometime over the weekend), I go through the pile with each of them to put everything away.

I essentially give my daughters 3 options for their artwork: display, dispose, or store. 

One of the key elements to making this system work is having several options for places where we can display any artwork that they want to have up. It needs to be easy to change out the artwork but also have enough space to display several things at once. I've come up with two spots in the house where we display their artwork (one in the basement and one in their bedroom). If you want to read more about either of those systems, just click on the pictures to go to the respective posts where I've described them in more detail:


The second key element is, of course, a method of storing artwork. I didn't really have anywhere for the girls to keep artwork they wanted until recently (mostly because they weren't old enough to understand the concept). After reorganizing my own closet, I was able to free up two under-the-bed sweater boxes to put under each of their beds. I told them those boxes were theirs to keep whatever they wanted- basically they are their "treasure boxes". However, I made it clear that they could only keep whatever would fit in the box and no more, so they would need to choose wisely (and may need to get rid of something else if they want to add to the box and it's already full). So far they have been very good about choosing only the most important items to keep in their box, and they have also been asking to occasionally rotate things that they have displayed in their bedroom with other things they had in their box, so I know they aren't completely forgetting what is in the boxes.


Of course the final element of the system is throwing out some of their artwork. I often will take a picture of pictures to share with family and friends beforehand (I've posted a few gems on my Instagram recently), but the girls and I are all learning to let go of a lot of those drawings that they didn't put a lot of time into instead of holding onto them forever and letting them pile up.

Having this system has made it much more manageable for us to sort through the piles of artwork and find a place for each one. I'm also hoping to go through everything that's in their boxes and on display once or twice a year to see if there's anything that's ready to be taken out of rotation. Hopefully this will help us keep everything under control, while still being able to enjoy their creativity, for the next few years!

What do you do with all the artwork your kids create? I'd love to hear your ideas in the comments!

Want more? Subscribe right here to the Organized Chaos newsletter and get ideas and resources for home and school sent straight to your inbox!

Tuesday, October 11, 2016

Classroom Jobs in Elementary Music: an update

I wrote last year about the classroom jobs that I implemented in my elementary general music classes (you can read more details on what jobs I used, how I implement them with hundreds of students to teach between kindergarten and 6th grade, and why I use them, here in my last post). Today I want to introduce you to the new job I added this year: Peace Keepers. So far the students and I are enjoying the change, and I think other classrooms would benefit from having this job in their classes as well.


First of all, let me review very quickly what my jobs were and how I implement them in my classroom. When I started using classroom jobs last school year, I had 6 jobs: Clean Up, Line Leader, Supplies (passing things out), Teacher Helper, Compliment, and Attendance. I assigned each of the jobs to a group of students rather than individuals, using the color "teams" I already have set up in my classroom based on their seat (read about that in this post). This way I don't have to keep track of hundreds of students, but everyone can still have a turn on each job- I rotate the jobs every few weeks so each team ends up having one turn on each job by the end of the year. The jobs are general enough either for the whole team to do the job together (cleaning up and passing out supplies) or to take turns (line leader, teacher helper).

Out of all the jobs I used last year, my favorite by far was the job of Compliment. At the end of class, one student from the assigned team is responsible for complimenting someone not on their team on anything they want- their work in music class, their value as a friend, or even their new shoes. This has been a great practice for students and, although they were hesitant and awkward at first, they love it just as much as I do now!

I decided that this year I wanted to add more responsibility for caring for each other- more opportunities for the students to practice social skills and take part in building a positive learning community- into the classroom jobs. After thinking about it over the summer, the result was my decision to add the job of Peace Keepers. Although it was actually going OK, I got rid of the Attendance job to make room for the new one- now I just let whichever student knows where missing students are tell me, just like I did for the first decade of my teaching!


I explained the job of Peace Keeper to my students as a way for them to assist in helping students who are upset. In particular, I wanted them to be the "first line of defence" when one or two students get upset with no obvious cause. I made it very clear that they were NOT going to be mediating every misbehavior and argument (we simply don't have that kind of time), or becoming everyone's confidant. However, if a student asked to sit out of class, or was visibly upset, and I couldn't immediately talk to them to find out what was wrong, I wanted the students to be able to go and ask them if they are OK and see if there is anything that they can do for them.

So far this has worked out very well. Only a few classes have actually made use of the job- the rest haven't really needed it (which is a good thing)- but the ones that have, used it well. I still need to do a better job reminding myself to utilize those students to go and check in on students when I'm in the middle of a class activity, but when we have used the job it has been very helpful for the student who is upset, for me, and for the ones doing the helping.

I'm happy to have another way for me to encourage students to contribute to a positive learning community and develop these important social skills. It can be hard, when we get such little time with our students, to find ways to spend time on the real work of relationship-building, but these classroom jobs have been an easy way to do that without taking away from class time! If you want to read more about my thoughts on, and strategies for, behavior management, go check out this post on the topic.

Have you used classroom jobs in your music room? How did you do it? What do you do to encourage students to invest in a positive learning community? Leave your thoughts below!

Want more? Subscribe right here to the Organized Chaos newsletter and get ideas and resources sent straight to your inbox!

If you are considering implementing classroom jobs in your music room, make sure to check out my original post on the topic here:


Monday, October 10, 2016

A Journey Through Pain, Healing, and Living: my story told through music

Every now and then I have shared parts of my difficult journey through marriage, divorce, and co-parenting on this blog. I have always been amazed and gratified to see the response to these posts- going through this kind of experience is often an extremely isolating experience, and if sharing my experience can help one person feel they are not alone, it is definitely worth it. Today I wanted to share some more of my journey in the best way I know: through music.


This post has been written in my head for a few months now. It is difficult to explain the emotional journey that I've been through in words, but over the years I've come across different songs that speak to where I was/am. Today I want to share with you, in chronological order, the songs that have really connected to my emotional experience over the last several years. I have found this to be one of the most effective ways of sharing my experience with others, and I hope that others going through difficult periods in their life will find comfort and connection somewhere in this list.

Before I do, though, a few important notes:
  1. As with any emotional journey, this is certainly not a straight trajectory. Although I am presenting the songs below in the order in which I most connected with them, there were and are times when I went back and forth between various emotional stages. 
  2. I'm not saying that each song is a perfect match to how I was / am feeling in my own experience. Obviously each situation is unique. However the overall message and feeling in each song was definitely something I deeply connected to and felt expressed where I was. 
With that, I offer you my journey, told through music.


Saturday, October 8, 2016

Small Goals: October 2016

I'm linking up with Jennifer over at The Yellow Brick Road to share my small goals for the month of October! If you haven't ever checked out the Small Goals monthly link-up, you really should head over to Jennifer's post (just click on the image below) and read through the posts. I always find it entertaining and insightful to read about what others are thinking and planning, and I often find inspiration for things I want to try myself as well!


First, a look back at the goals I set last month:

1. Remember to take my lunch out of the fridge

So I figured this one out but maybe not in the way I had intended- I just stopped putting my lunch in the fridge. I now put my packed lunch (with an ice pack) right next to my purse as soon as I make it. I haven't forgotten to take my lunch to school since.

2. Try not to scream when I hear, "I want"

This fun phase that my daughter was going through has died down enough for me to say that I did achieve my goal. I'm not saying I don't still have 4 year olds who often *cough* act their age, but the constant whining has been toned down enough to make it manageable. 

3. Get the rest of my new centers set up

Yes! This is an actual thing that I actually did! I just finished putting together the last one this past weekend and I will be sharing some of my new ideas in future blog posts.

OK, so on with this month's goals!

1. Reconnect with a few friends

With all of the back-to-school craziness, I have to admit I have let some of my friendships slip onto the back burner. I've recently had several moments when one of them would pop into my head randomly and I would realize that I hadn't talked to them since August- I think that's my cue to set aside some time to reconnect! I have 3 people specifically in mind that I definitely want to get in touch with in the next couple of weeks, even if it's just a few texts.

2. Enjoy Halloween with my daughters

I'm not really a Halloween person, to be honest. I grew up in Japan where (at least in my day) it wasn't even a thing. But this year I am looking forward to doing a little trick-or-treating with my girls, because it's the first time in 3 years that we'll actually be together for Halloween evening (just the way the days fell with custody the last 2 Halloweens). As you might imagine, the last time I was with them for trick-or-treating time they weren't really into it (being under 2 at the time). I'm hoping to convince them not to dress up as Disney characters, but that may be setting the bar too high for myself...

3. Start teaching ukulele for the first time

Yes it's true. I got a donorschoose project funded just before the start of summer vacation, and my instruments finally all arrived a few weeks ago! I've been scheming for months now and I can't wait to introduce my 6th graders to the ukulele! I am slightly dreading the inevitable tuning/string issues, but I think it will be worth it. I have a picture on my Instagram account if you want to see them hanging beautifully on my classroom wall!!!! :)

I think that's it for me this month! Make sure to go check out Jennifer's post to read about what other bloggers are up to this month and share your own small goals :)

Tuesday, October 4, 2016

Things to do While Students are Waiting in Line

For one reason or another, I often find myself with a class ready to transition to the next teacher, but with that next teacher nowhere in sight. What do you do when that happens? It can be difficult to keep students quiet and orderly while standing in line, but ready for the next teacher whenever they arrive. I've used different ideas over the years but here are my current favorites.


I used to do more singing and body percussion when I was waiting with a class, but in my current school, because of the location of my classroom and where we usually line up, we have to stay pretty quiet in line to avoid disrupting other classes. All of the ideas below are ones that can be done silently.

1. Mirroring

This is probably the simplest but also the most effective for all ages. I hold up my hand from the front of the line and tell them to mirror me. Depending on how well the students can see me at the back, I will either just do slow movements with my hands, held above me head, or (if they can see me) include my head/face/shoulders in the movements as well. I start off with simple movements, like counting on my fingers from 1 to 5, or clenching and unclenching my fist. Once they get the idea, are quiet and focused, and are just starting to think this might be too boring, I start throwing in some challenges: holding my pinky with my other fingers, moving only one finger, etc (this is admittedly a little easier for me because I'm double jointed!). I also use some silly motions, like the spiderman hand (when he is shooting spiderweb stuff out of his wrist), or pretending to pick my nose.

2. Silent Singing

If you've recently done a song in class with hand motions, start mouthing the words while doing the motions and have students do it with you! Not only do you get to review the song, but it's good steady beat practice and it's pretty hilarious. With older students it's even fun to bring back some of their favorites from kindergarten and 1st grade. Their faces light up when they recognize the song (and then I have to remind them not to sing out loud)!

3. Addition Game

This one has nothing to do with music but it is another option that works well and gives them some practice on their math facts (which no administrator or homeroom teacher will ever complain about!). I tell them I am going to hold up a certain number of fingers, and they have to hold up the number of fingers needed to add up to 5 (or 10). This is especially mind-stretching if you do it after the mirroring activity :)

I hope you found at least one new idea here to add to your "bag of tricks"! What are your favorite things to do when you'r stuck waiting in line?

Want more? Subscribe right here to the Organized Chaos newsletter and get ideas and resources for elementary music teachers sent straight to your inbox!

Monday, October 3, 2016

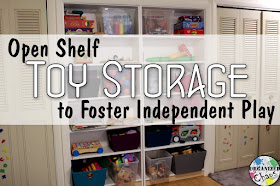
Open Shelf Toy Storage to Foster Independent Play

My biggest home improvement project since moving into our new home almost a year ago has been the finished basement. I've gradually been transforming it from a dark TV room into a bright, happy kid's playroom. One of the biggest changes to the space, besides painting the dark wood paneling white, was putting in some new white shelves to hold a lot of the girls' toys. The new storage has been working out really well and has allowed the girls to play more independently, so today I wanted to share what I did!


I had this open space in my wall after taking out a giant china cabinet (that I moved to another room), and these Billy bookcases from IKEA fit perfectly! I already had the colored fabric bins (craigslist finds from years ago), but I also wanted to get some clear bins, especially for the higher shelves, so that the girls could see what was in the bins without taking them off the shelves. It may not look as clean and sleek, but I decided long ago that when it comes to toy storage, ease of access for the people using them is more important than how magazine-ready it looks!

I found these clear bins at IKEA to use on the shelves. Put sideways, they fit perfectly on the shelf. Turned longways, they stick out from the shelf a little bit, but they still stay just find and allow more room to put other bins and toys next to them. Also, they're a lot cheaper than most anything else I saw that was tall enough to maximize the shelf space!


I put all of the toys that the girls use the most (and that I'm comfortable with them using without supervision) on the bottom shelves, and gradually worked my way up to the items that I don't mind them playing with, but definitely require supervision. For now, that mostly includes things like big paint bottles, beads, and board games with lots of pieces that I don't want to lose :)


Although it's probably not ready for any home decorating magazine features, I do like that the girls can see everything clearly and access all of the toys that I want them to reach on their own, and I don't really mind the "eclectic" look of the fabric bins, clear bins, and loose toys mixed together on the shelves. Now that they know where everything is, the girls will quite often run down the stairs and start playing on their own without me even being in the same room (which is no small miracle for me!). Mission accomplished! ;)


You don't need big bookcases to utilize the concept of open shelf storage for toys at home. If you're interested, here is my previous post on how I organized the toys in our old apartment with the same principles:


Want more? Subscribe here to the Organized Chaos newsletter and get ideas and resources for home and school sent straight to your inbox!