
Today I'm linking up with Shelley Tomich at Pitch Hill to share a tech tip with you. I've included the link to the link-up at the bottom of this post, so don't forget to check out all the other fantastic tech tips over there! This tech tip is one that I have shared on this blog before, but is so awesome that is bears repeating: how to make your own interactive whiteboard system for under $50.

Today I'm sharing a tutorial on my biggest school project last year: my DIY interactive whiteboard (aka SmartBoard, Promethean Board etc). I know it sounds crazy to make your own interactive whiteboard, but trust me, it's not nearly as techy and complicated as it sounds, and get this: if you have a projector, this thing will only cost you $50!! That's a lot less than the astronomical amount it would cost you to get a name-brand SmartBoard or other pre-made interactive whiteboard. So it's definitely worth the sweat equity to get it going.
Materials:
1 Wii Remote (like this one)- around $20
1 Infrared Pen (like this one)- $20-$30 depending on the type you choose
Wiimote Whiteboard software (like this one)- free
Computer with bluetooth capability (or you can get a bluetooth dongle here)
Projector (preferably mounted, but not required)
1. Make sure you have a projector and a space on which to project an image. It can be a regular whiteboard, a projector screen, or even a wall (which is what I used- and actually prefer).

Because my walls are pretty old and yucky, I bought some white contact paper and black painter's tape at Home Depot and put it up on the wall where the projected image goes. It is a nice touch that helps define the space for the students, and it makes it easier to see because you can't see the chipped paint on the wall, but it is definitely not necessary.
If possible, make sure the projector is mounted- and if you can't do that, get it as stable and immovable as possible. The less it moves the better. Connect your computer to your projector.
2. Buy a Wii remote and IR (infrared) pen. Use the links above or you can shop around for your favorite type. There are tons of different pens you can get here, as well as several other online options. You could even make your own pen if you wanted, but no need to dive into that unless you are really up for an adventure! :)
3. Download the correct version of the free software onto your computer to match your operating system. If you want to explore all the software versions available, you can check out this site, but I recommend sticking with the one already mentioned.
4. Open bluetooth on your computer. Open the back of the Wii remote (where you put in the batteries) and push the red button until you see the Wii remote appear under the list of bluetooth items on your computer. Your remote is now connected to your computer.
5. Open the Wiimote software you downloaded. Hold down the 1 and 2 buttons on the front of the Wii remote at the same time. You may see some text scrolling in a new window- this is good. Keep holding the buttons. When you see a blue bar appear towards the top of the Wiimote software window showing the battery level, you are successfully connected and can stop holding the buttons.

6. Turn on your projector. Set your Wii remote up somewhere where the black end can "see" the whole projected image- this is the tricky part. You can tape it to the projector, set it on a table, or use a mic stand to point it towards the image. It needs to be far enough away to get the whole screen but close enough to be able to "see" the IR pen. I used a mic stand for several months and ended up mounting it to the ceiling like this:

If you want to use this setup you will need to buy a mount like this. For me it was worth it because of the way my room is set up (sky lights: great for natural lighting, not so great for projector installation), but most people will probably find it easiest to stick it on to the projector itself. Keep in mind that the Wii remote can "see" about 45 degrees on either side.
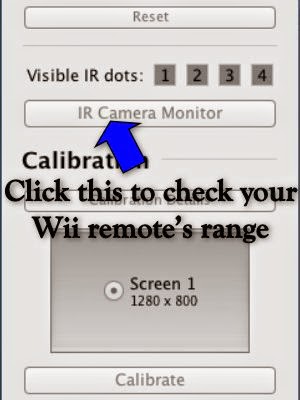
*You can check to see how much of the screen the Wii remote is "seeing" by clicking on the IR camera monitor and then making the window full screen. Click around in all corners of the screen to see if a dot shows up when you click.
7. Click "calibrate" in the Wiimote software. You will see a bulls-eye on the left top corner of the screen. Click on the center of the bulls-eye with your IR pen. If your remote is positioned correctly, you will see a green check mark. Yay! Now do the same thing in the new bulls-eye that has now appeared on the top left side. You will then do the two bottom corners. If you get green checks in all 4 corners, you are all set to use your board! It is very important that you are careful to click as close to the center of each bulls-eye as possible. The further off your points are here, the more your calibration will be off when you try to do something on your new interactive whiteboard. Take your time! If it's not working, play around some more with the Wii remote positioning. You also need to make sure you aren't blocking the Wii remote from seeing the IR pen with your body. Make sure you stand to the side while you click.

Extras (I use but aren't necessary):
Contact paper/ painter's tape
Gator mount for ceiling or desktops for Wii remote (like this one)
Rechargeable battery pack for Wii remote (available here for $12.99)
Smart Notebook (available here- they have free trials) or other interactive whiteboard software
Getting your own interactive whiteboard definitely takes some trial and error but it is SO WORTH IT. There are so many benefits to having an interactive system in the elementary music classroom, but so few schools that provide their music rooms with the funds to buy a pre-made one. I hope that I can help inspire more music teachers to give it a shot- please let me know if you need any help along the way!
I hope you enjoyed this post. Now go check out the other awesome tips for technology in the music room (including lots of great tips for iPads!) by heading over to the Tech Talk Tuesday linkup:

So impressed! To think you can do this for less than $50! I think I spent more at the grocery store today! :)
ReplyDeleteI just nominated you for the Liebster Award. You can read more about it here: http://www.yellowbrickroadblog.com/2014/11/liebster-award.html
ReplyDelete