Image Map
Showing posts with label interactive whiteboard. Show all posts

Tuesday, October 31, 2017

An Organized Music Teacher Computer: Projector / Whiteboard Visuals

One of the biggest organizational struggles of the modern music teacher has to be digital organization. It's one of those problems that's great to have- with so many amazing online and digital resources out there, it's easy to accumulate way too many wonderful files on your work computer that would make your teaching so much better..... if you could just find them. Obviously there are a lot of aspects to digital organization that will help streamline and organize your files, but today I want to share a simple solution that I came up with this year that has streamlined my computer files significantly!


I've been using some form of projected images, whether it's PowerPoints on a pull-down screen or Smart Notebook files on an interactive whiteboard, for many years now. The first year I started using projected visuals, I would have a folder for each grade / class I taught, and I would save the file for each lesson in that folder and label it with the date. I figured then I could just reuse those same files the following year. What ended up happening in reality was that I wanted to change the order I was teaching, or update a lesson, or just update the visuals, and I ended up creating a whole new folder for every grade each year. And because I couldn't remember exactly when I taught certain lessons, I would have to search through tons of files to try to find the visuals that I wanted to use for my lesson- I probably could have just remade them in the time it was taking me to search for them.

So then I got smarter and started labeling the files with a word or two about the lesson or concept I was teaching in that file. This made it easier to find visuals from the previous year to reuse from year to year, but I was still creating an entire new folder every year and accumulating hundreds, maybe thousands, of files of the same repetitive material year after year. I couldn't figure out how to save my visuals so I wasn't starting from scratch each year without continuing this endless accumulation of files!

Enter my monthly lesson banks. If you haven't already, be sure to read this post on how I started organizing and pre-planning my lesson materials by month for each class- this simple change in my long-range planning has been seriously life changing. One aspect of this monthly planning strategy that I didn't realize would be a benefit was the organization of my PowerPoints for each lesson! Last year, when I was creating my monthly lesson banks, I created all of the projector visuals to go with those lessons at the same time and saved all of the visuals for each grade by month in a single file.

This year, I started off doing the same thing I've always done for my PowerPoints- I would copy and paste the slides I was going to use for the next lesson out of the monthly file for that grade, and save it with the date and concepts taught. Then it hit me: there was no reason for me to do that because I already have all of the visuals organized by grade and by month!

Now, instead of having those folders full of hundreds of files of duplicated, hard to search visuals, I have my "master folder" labeled "curriculum". Inside that folder is a folder for each grade, and within each grade I have a folder for each month, containing all of my plans, printables/ worksheets, and projector visuals for that month. Then I have ONE FILE for each grade / class saved to my desktop. When I am getting the visuals ready for each lesson, I delete the previous lesson's slides and save the new slides to that file, so the files on my desktop always have the current lesson's visuals saved and easily accessible.


See those boxes with purple headers? They are a free download from The Yellow Brick Road- grab them here if you want to organize your desktop by categories!

This has made my life so much easier, and my computer so much more streamlined. And when I do create or modify a slide for this school year, I just add the new slide to the monthly "master file" so I have it for next year.  Yessssssss!

This system will work for any software you're using for visuals- the PowerPoints I made are image files on each slide so they are easy to copy into different programs! Last year I used Smart Notebook. This year I'm trying to use PowerPoint, but if I get a new interactive whiteboard with its own software, I know I can always copy and paste the slides into that software.

How do you organize all of your visuals on your computer? Organization is a very personal thing because whatever we use has to make sense to us for it to really work- I'd love to hear about any other systems others are using to streamline their digital files in the comments section!

Want more tips like this? I share timely news, ideas, and resources once a month in my newsletter! Click here to sign up!

Tuesday, June 21, 2016

things to make this summer for your classroom next year

Although it's important to take some time to relax and chill over the summer and spend time with family, summer is also a great time for teachers to check off some of those projects that you never have time for during the school year but would make your life so much better and improve your students' learning experiences too! A few weeks ago I shared some summer tips for making next school year easier, and one of the things I mentioned was putting together materials to use in your classroom. Today I wanted to share some of the things I either put together in past summers or will be putting together this summer to use in my classroom. Each of these projects takes a bit of time but has made a big difference in my teaching (or will next year, I'm sure!).


Rhythm / Pitch Manipulatives

There are so many great ways to make composition more engaging and help students understand pitch and rhythm concepts using simple manipulatives. It's amazing how much more young students are able to understand when they can physically manipulate something instead of trying to write it on a piece of paper! Here are some great ones I used for the first time this past year. I am making more this summer because they worked so well!

Rhythm Monsters- these are basically magnets with googley eyes on them, but they are so much more than that in the music room! I used the colors to show different solfege pitches and the number of eyes to show the number of sounds in a beat. I even had special monsters for quarter rests and half notes! Click on the picture below to see a more detailed explanation of what I did, how I used them, and get directions and supplies for how to make some for yourself.


Solfege Stickers- these are even simpler than the rhythm monsters but worked great with my upper elementary students. I just colored some Avery labels different colors to match the colors of the boomwhackers in my classroom and had students use them to turn a rhythmic composition into a melodic one! Check out the post for more details:


Games to Use in Centers

I use centers as a reward for my students, so I try to make the center activities as fun as possible. One of my students' favorites is Kaboom, which is played by pulling sticks out of a jar. I know, sounds exciting, right? I can't believe how much my students love this game. The best part is you can use it to practice almost any concept imaginable! Details about how to play the game and how I use it are in this post:


Another type of game I put together last summer that my students enjoyed was the card games I got from Musical Interactions. I got this Rhythm Go Fish game, along with a few others, and the students have gotten a kick out of them. All I had to do was print on card stock, cut, and laminate. This year I picked up Rhythm Dominoes from her store to put together too- I think it will be a great change of pace and another great way to practice concepts while still having fun! These are another simple print/cut/laminate project.

There are lots of other board / card games you can put together pretty easily by adapting a pre-made game to make a musical game to use in class. Shelley Tomich from Pitch Publications has several games where you simply adapt a pre-made game, like this take on "Don't Spill the Beans". Sally Utley has some music games using the letter tiles like the ones from Bananagrams. Or you could make a musical Twister game like the one Jennifer shared on her blog, In My Music Class (this one is also on my list to make this summer!):


Other Center Materials

Of course there are plenty of other centers that aren't games per se but still require some making. For me the queen of centers is Tracy King. She has so many creative ideas for centers, it's insane! One I am thinking about making this summer is her Dip Tray Workstation- so simple, but such a great way to practice basic concepts!


Visuals for Behavior Management

For whole class management systems, you usually need some type of visual to help both you and the students see how they are doing and motivate everyone to do better. I love the board I made two summers ago (and have adapted a few times since). I've rounded up a lot of my behavior management ideas in this post, which you may want to read if you're looking for a new behavior management strategy (or just want to tweak your existing one). You can read about how I made my board (it's pretty easy and cheap, trust me!) and how I use in these two posts:


Other Classroom Tools

One of the biggest projects I've ever taken on for my classroom was my DIY SmartBoard. If you don't have an interactive whiteboard system but would like to have one (and you really should, it can help students so much and make your life easier too!), this is a great option. Not counting the projector, the system costs under $50. Get all the directions for how I set mine up here:


My last project idea is just for you, teachers! I love my little teacher toolbox that I put together. It saves me so much time when I'm looking for those pesky little things that always get lost when they're just stuck in a desk drawer, and I can even send students to fetch things themselves because everything is labeled and in its own drawer. This is a super easy project and will save you tons of drawer space. I seriously downsized my teacher desk last summer and this was one of the reasons I was able to do it comfortably. See how I made it here:


Whew, that's a lot of summer projects! I hope you found some inspiration to get your crafting on this summer and get ready to have an even more fabulous year next year :) Which project is your favorite? What other things are you making for your class this summer? Leave a comment!

Want more? Subscribe here to the Organized Chaos newsletter and get music teacher ideas and resources sent straight to your inbox!

Tuesday, April 14, 2015

Teacher Tuesday: lesson ideas for teaching rhythm

Welcome back to Teacher Tuesday! Today I'm sharing my favorite ways to teach rhythm in a full-class lesson setting. Obviously rhythm is something that comes up in almost every song that we learn in class, but these are my favorite activities to use when we are really focusing on a particular rhythm.


1. Ostinato Composition

I think of composition just like writing in any other language: it is the highest level of skill development (just like we speak, then read, then write in our native tongue). So the best way to practice a musical element (and assess student understanding) is to use it in composition! One easy way to do this is to have students add an ostinato to a familiar song. I usually pick a song we have recently learned that they know well and love, and tell them to create a 1-measure pattern to add to the song, using the rhythm we are learning somewhere in their pattern. I usually have them create the rhythm in small groups by clapping, or individually by writing it down, then have them choose a percussion instrument to use with the class. Sometimes we perform the song in a "theme and variations" format, where we sing the song over and over while one group or student at a time performs their ostinato as an accompaniment, or we will put all or several of the ostinati together to create a more complex, layered accompaniment. With older students I throw in some higher-order thinking by asking students to choose an instrument that fits with the overall message of the song, and after the performance, I have the class discuss which ones best fit with the piece. Another extension is to transfer the rhythm to xylophones or other pitched percussion!

2. Rhythm Chairs

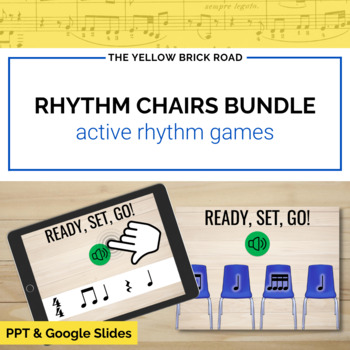
Split the class into two groups, with each group in a line leading to the front of the room, where you will be displaying a 1-measure rhythm (on a projector screen, whiteboard, or even flashcards in your hand). At the front of each line, put 4 chairs going across, facing the front of the room. Tell the students that a person is a note, and a chair is a beat. They need to show you whatever rhythm they see. On your signal, show the first rhythm. The first team to get the correct number of people in the correct chairs wins that round- if there are two eighth notes on a beat, two people share one chair, a quarter rest would be indicated by an empty chair, and they would show a whole note with one person laying across four chairs etc. The best part of the game is making them figure that all out on their own without any additional instructions! This game has been a real aha moment for many of my students, and boy is it fun! I've been doing this game with just 1-measure rhythms projected on the screen, but Jennifer at The Yellow Brick Road has an awesome file, including game instructions and rhythms to use in the game, in her store here:

Rhythm Chairs Bundle

3. Rhythm Battle

I use this as a special activity during Music In Our Schools Month (read more about the things I do for MIOSM here), but you could definitely pull this out any time of year!I choose a song with a clear, stead beat- usually the instrumental version of an upbeat pop song to rev them up :) After the music starts, I put up a slide on my projector that says "Rhythm Battle!". When the intro is ending, I count off 4 beats and click to the next slide on "four". There is a 4 beat rhythm on that slide. If the class claps it correctly, I click to the next 4-beat rhythm slide on the 4th beat, and they have to continue clapping with no pause. They keep going until they make a mistake. When they mess up, they go back to the first slide and start over. Whatever their longest run is before the song ends, that is their class score for the day.  For MIOSM I keep a running tally throughout the month and the winning class from each grade level gets a prize. The competitive aspect definitely makes it more exciting, so I recommend running it as a competition between classes, but you could also set a goal for a certain score and work towards the goal. This is by far the best activity I have found for improving sight reading, and the kids beg for it every year! Here are the slides I use if you're interested- you can also easily make your own slides to fit the level of your students or even use flashcards if you have those.

I also do a lot of focused practice on rhythm concepts in small groups/centers. If you missed my post last week on center ideas for teaching rhythm, go check it out here:


Tuesday, January 27, 2015

Teacher Tuesday: teaching letter names of notes on the staff (part 2)

If you missed last week's Teacher Tuesday post, I talked about my favorite full-class activities for teaching the letter names of notes on the staff in any clef. You can read that post here. Today, as promised, I'm back to talk about my favorite activities to teach letter names in small groups. I use these activities primarily in centers, where students are rotating through the different activities to practice the letter names. Whenever I introduce a new clef (I push treble clef in 3rd and bass clef in 5th grade), I usually plan one class period of full-class activities to practice the letter names, and then one class period of centers, where students can get more practice. As with most center activities, the students need to have some grasp of the concept (or have a place to find that correct information) in order to successfully complete the activity independently.


1. Music Tutor (iPad)
This iPad app comes in a free and paid version. The free version has ads, but the paid version is just $1.99 so it's probably worth the investment. I love this app because you can customize it to treble, bass, or both clefs, you can customize the range of notes it displays- you can set it to use ledger line notes or just the line and space notes, and you can choose the amount of time on timer. I like to use the 1 minute timer so that it keeps the fast pace. There are plenty of other great iPad apps, both free and paid, for practicing letter names on the staff- this is just one example- but I do like this one because it is simple, straight-forward, and fast-paced. Here are some other great iPad apps for practicing note names.


2. Card Matching Game
I print off a picture of each note on the staff (one of each letter name) and one of each of the letters A-G, and put them on construction paper (I've done it where all the cards were the same color, or where the notes were on one color and the letters were another- two different levels of difficulty depending on what you do). The rest is just like memory matching except you are matching the note to the correct letter. I like having this center because it is a bit more low-pressure than some of the others.


3. Note Spelling Game
There are a lot of ways to do this but my favorite method (because it is the most low-maintenance) is this: I have words spelled with note letters (like CABBAGE or FADE) on folded pieces of paper in a cup, and enough dry erase boards and markers for each student. On "go", each student opens the paper they picked from the cup and races to write whatever word they got on the staff. Whenever they finish writing they yell "done" and the other students check their answer. If it's wrong, the game continues.

(Other variations could include using tokens or other small manipulatives on a staff or having all the students write the same word. I like dry erase because I don't have to keep up with a bunch of little manipulatives, and I like doing different words for each student because it adds that element of luck and unpredictability that feels more like a game for kids.)


3. Kaboom Sticks
This idea has been making its way around Pinterest for a while under a few different names (including Fiddle Sticks and Busted), but whatever you call it, it's definitely a kid favorite! I use this for rhythms as well. I'll let the guy that I took the idea from explain (see video below), but for my version I write the notes on the staff on the sticks and the student has to identify the letter name.


4. Swat the Note
If you've been paying attention you know that this was on my list for full-class activities as well. I use it for both. Basically one person says a letter name and the other students race to touch the note on the staff. What's fun about doing it as a small group activity is that I have the students take turns being the judge and caller. They LOVE getting to do that after doing it as a whole class beforehand. I've set it up for small groups by writing on a regular whiteboard or showing a projected image, and having them use fly swatters to swat the note or just hitting it with their hands. 


Well, there you have it: my favorite small group activities for practicing note letter names. I hope you found these ideas helpful!

Tuesday, November 11, 2014

Linkup: Tech Talk Tuesday (DIY Interactive Whiteboard tutorial)

Today I'm linking up with Shelley Tomich at Pitch Hill to share a tech tip with you. I've included the link to the link-up at the bottom of this post, so don't forget to check out all the other fantastic tech tips over there! This tech tip is one that I have shared on this blog before, but is so awesome that is bears repeating: how to make your own interactive whiteboard system for under $50.


Today I'm sharing a tutorial on my biggest school project last year: my DIY interactive whiteboard (aka SmartBoard, Promethean Board etc). I know it sounds crazy to make your own interactive whiteboard, but trust me, it's not nearly as techy and complicated as it sounds, and get this: if you have a projector, this thing will only cost you $50!! That's a lot less than the astronomical amount it would cost you to get a name-brand SmartBoard or other pre-made interactive whiteboard. So it's definitely worth the sweat equity to get it going.

Materials:
1 Wii Remote (like this one)- around $20
1 Infrared Pen (like this one)- $20-$30 depending on the type you choose
Wiimote Whiteboard software (like this one)- free
Computer with bluetooth capability (or you can get a bluetooth dongle here)
Projector (preferably mounted, but not required)

1. Make sure you have a projector and a space on which to project an image. It can be a regular whiteboard, a projector screen, or even a wall (which is what I used- and actually prefer).


Because my walls are pretty old and yucky, I bought some white contact paper and black painter's tape at Home Depot and put it up on the wall where the projected image goes. It is a nice touch that helps define the space for the students, and it makes it easier to see because you can't see the chipped paint on the wall, but it is definitely not necessary.

If possible, make sure the projector is mounted- and if you can't do that, get it as stable and immovable as possible. The less it moves the better. Connect your computer to your projector.

2. Buy a Wii remote and IR (infrared) pen. Use the links above or you can shop around for your favorite type. There are tons of different pens you can get here, as well as several other online options. You could even make your own pen if you wanted, but no need to dive into that unless you are really up for an adventure! :)

3. Download the correct version of the free software onto your computer to match your operating system. If you want to explore all the software versions available, you can check out this site, but I recommend sticking with the one already mentioned.

4. Open bluetooth on your computer. Open the back of the Wii remote (where you put in the batteries) and push the red button until you see the Wii remote appear under the list of bluetooth items on your computer. Your remote is now connected to your computer.

5. Open the Wiimote software you downloaded. Hold down the 1 and 2 buttons on the front of the Wii remote at the same time. You may see some text scrolling in a new window- this is good. Keep holding the buttons. When you see a blue bar appear towards the top of the Wiimote software window showing the battery level, you are successfully connected and can stop holding the buttons.


6. Turn on your projector. Set your Wii remote up somewhere where the black end can "see" the whole projected image- this is the tricky part. You can tape it to the projector, set it on a table, or use a mic stand to point it towards the image. It needs to be far enough away to get the whole screen but close enough to be able to "see" the IR pen. I used a mic stand for several months and ended up mounting it to the ceiling like this:


If you want to use this setup you will need to buy a mount like this. For me it was worth it because of the way my room is set up (sky lights: great for natural lighting, not so great for projector installation), but most people will probably find it easiest to stick it on to the projector itself. Keep in mind that the Wii remote can "see" about 45 degrees on either side.

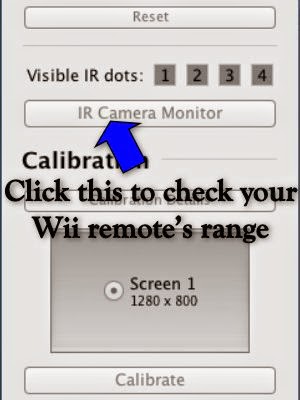
*You can check to see how much of the screen the Wii remote is "seeing" by clicking on the IR camera monitor and then making the window full screen. Click around in all corners of the screen to see if a dot shows up when you click.


7. Click "calibrate" in the Wiimote software. You will see a bulls-eye on the left top corner of the screen. Click on the center of the bulls-eye with your IR pen. If your remote is positioned correctly, you will see a green check mark. Yay! Now do the same thing in the new bulls-eye that has now appeared on the top left side. You will then do the two bottom corners. If you get green checks in all 4 corners, you are all set to use your board! It is very important that you are careful to click as close to the center of each bulls-eye as possible. The further off your points are here, the more your calibration will be off when you try to do something on your new interactive whiteboard. Take your time! If it's not working, play around some more with the Wii remote positioning. You also need to make sure you aren't blocking the Wii remote from seeing the IR pen with your body. Make sure you stand to the side while you click.


Extras (I use but aren't necessary):
Contact paper/ painter's tape
Gator mount for ceiling or desktops for Wii remote (like this one)
Rechargeable battery pack for Wii remote (available here for $12.99)
Smart Notebook (available here- they have free trials) or other interactive whiteboard software

Getting your own interactive whiteboard definitely takes some trial and error but it is SO WORTH IT. There are so many benefits to having an interactive system in the elementary music classroom, but so few schools that provide their music rooms with the funds to buy a pre-made one. I hope that I can help inspire more music teachers to give it a shot- please let me know if you need any help along the way!

I hope you enjoyed this post. Now go check out the other awesome tips for technology in the music room (including lots of great tips for iPads!) by heading over to the Tech Talk Tuesday linkup:

Picture

Tuesday, September 2, 2014

Teacher Tuesday: DIY interactive whiteboard


Welcome back to Teacher Tuesday! Today I'm sharing a tutorial on my biggest school project last year: my DIY interactive whiteboard (aka SmartBoard, Promethean Board etc). I know it sounds crazy to make your own interactive whiteboard, but trust me, it's not nearly as techy and complicated as it sounds, and get this: if you have a projector, this thing will only cost you $50!! That's a lot less than the astronomical amount it would cost you to get a name-brand SmartBoard or other pre-made interactive whiteboard. So it's definitely worth the sweat equity to get it going.

Materials:
1 Wii Remote (like this one)- around $20
1 Infrared Pen (like this one)- $20-$30 depending on the type you choose
Wiimote Whiteboard software (like this one)- free
Computer with bluetooth capability (or you can get a bluetooth dongle here)
Projector (preferably mounted, but not required)

1. Make sure you have a projector and a space on which to project an image. It can be a regular whiteboard, a projector screen, or even a wall (which is what I used- and actually prefer).


Because my walls are pretty old and yucky, I bought some white contact paper and black painter's tape at Home Depot and put it up on the wall where the projected image goes. It is a nice touch that helps define the space for the students, and it makes it easier to see because you can't see the chipped paint on the wall, but it is definitely not necessary.

If possible, make sure the projector is mounted- and if you can't do that, get it as stable and immovable as possible. The less it moves the better. Connect your computer to your projector.

2. Buy a Wii remote and IR (infrared) pen. Use the links above or you can shop around for your favorite type. There are tons of different pens you can get here, as well as several other online options. You could even make your own pen if you wanted, but no need to dive into that unless you are really up for an adventure! :)

3. Download the correct version of the free software onto your computer to match your operating system (Windows here, Mac here). If you want to explore all the software versions available, you can check out this site, but I recommend sticking with the one already mentioned.

4. Open bluetooth on your computer. Open the back of the Wii remote (where you put in the batteries) and push the red button until you see the Wii remote appear under the list of bluetooth items on your computer. Your remote is now connected to your computer.

5. Open the Wiimote software you downloaded. Hold down the 1 and 2 buttons on the front of the Wii remote at the same time. You may see some text scrolling in a new window- this is good. Keep holding the buttons. When you see a blue bar appear towards the top of the Wiimote software window showing the battery level, you are successfully connected and can stop holding the buttons.


6. Turn on your projector. Set your Wii remote up somewhere where the black end can "see" the whole projected image- this is the tricky part. You can tape it to the projector, set it on a table, or use a mic stand to point it towards the image. It needs to be far enough away to get the whole screen but close enough to be able to "see" the IR pen. I used a mic stand for several months and ended up mounting it to the ceiling like this:


If you want to use this setup you will need to buy a mount like this. For me it was worth it because of the way my room is set up (sky lights: great for natural lighting, not so great for projector installation), but most people will probably find it easiest to stick it on to the projector itself. Keep in mind that the Wii remote can "see" about 45 degrees on either side.

*You can check to see how much of the screen the Wii remote is "seeing" by clicking on the IR camera monitor and then making the window full screen. Click around in all corners of the screen to see if a dot shows up when you click.


7. Click "calibrate" in the Wiimote software. You will see a bulls-eye on the left top corner of the screen. Click on the center of the bulls-eye with your IR pen. If your remote is positioned correctly, you will see a green check mark. Yay! Now do the same thing in the new bulls-eye that has now appeared on the top right side. You will then do the two bottom corners. If you get green checks in all 4 corners, you are all set to use your board! It is very important that you are careful to click as close to the center of each bulls-eye as possible. The further off your points are here, the more your calibration will be off when you try to do something on your new interactive whiteboard. Take your time! If it's not working, play around some more with the Wii remote positioning. You also need to make sure you aren't blocking the Wii remote from seeing the IR pen with your body. Make sure you stand to the side while you click.


Extras (I use but aren't necessary):
Contact paper/ painter's tape
Gator mount for ceiling or desktops for Wii remote (like this one)
Rechargeable battery pack for Wii remote (available here for $12.99)
Smart Notebook (available here- they have free trials) or other interactive whiteboard software

Getting your own interactive whiteboard definitely takes some trial and error but it is SO WORTH IT. There are so many benefits to having an interactive system in the elementary music classroom, but so few schools that provide their music rooms with the funds to buy a pre-made one. I hope that I can help inspire more music teachers to give it a shot- please let me know if you need any help along the way!