Image Map
Showing posts with label DIY. Show all posts

Tuesday, July 28, 2026

DIY Magnetic Classroom Management Board

I've been using a magnet board I made myself to be my visual for my classroom management tracker for over a decade now, and I like it so much better than the sticker charts I used to use, or the clip charts with clothespins I see other teachers using for similar purposes! I put mine together with scraps of materials and have used it every class period, every day, modifying it slightly over the years as my systems have shifted. If you're interested in trying something similar, here's how I set mine up- it's very flexible so you could absolutely adapt it to your classroom and make it your own!


The board currently serves two main functions: tracking "points" earned towards different incentives that each class is working towards in my whole class management system by moving up the black keys, then the white keys, then all the keys chromatically on the piano (read all about the system, how they earn points, what incentives I use, and my philosophy behind it in this post), and displaying the rotating class jobs to which each color team is assigned (read all about how I use classroom jobs in this post, and about my color team seating arrangement in this post).

The board itself is an oil drip pan that I bought at Walmart years ago. Mine is 25x47 inches, and apparently they don't make the ones that are that size anymore, unfortunately, because they seem to be out of stock everywhere! But this is it, in case it comes back in stock. This one is the closest I can find at 25x36 inches- it's a bit shorter but I think would do the same job.

The rest of the board is mostly contact paper and tape! I had some leftover white contact paper from another project that I used to cut out two large rectangles to be the 2 piano keyboards (I decided to make 2 separate pianos, one for K-3 and one for 4-6, so the piano keys wouldn't be so crowded if I tried to put all the classes on one piano). Then I used a ruler and permanent marker to draw lines to separate all the white keys, keeping them the same width as the black painter's tape I had on hand (I use it to "frame" all of my posters on my classroom walls). Then I used strips of the black tape to make the black keys. 


The colored boxes are just strips of the colored duct tape I use to tape the lines on the floor to mark where each color row sits, then I outlined each square with the same black painter's tape I used for the piano keys. Then for the open space next to those squares, I just stuck on a bunch of music note stickers I had from my scrapbooking days and some leftover bulletin board letters to spell out "Music Rocks!". I've had different ideas over the years for using that space but never have changed it, but it could be a good place to display the main "class rules", keep track of rewards earned, or even display photos of classes that have done something great as another incentive.


I made the magnets by either printing or handwriting onto regular printer paper and sticking the paper to these adhesive magnet sheets: I designed the minion images to show the job each color team is assigned that marking period, and cut out small strips of plain white to handwrite the class names to move up the piano keys.

I pieced all of this together by hand from scraps I already had, but if you aren't feeling super crafty I've made printable versions of the piano keyboards and classroom jobs (minus the minions so they'll fit any classroom theme) that you can get in this set here

I hope this helps give you some inspiration to create your own magnet board for your classroom! Like I said there are so many ways this can be customized for whatever system you're using- using the oil drip pan is just a really cost-effective way to get a good sized magnet board on the cheap, and it's so much sturdier (and, I think, looks cooler) than sticker or clip charts! Let me know in the comments if you have any questions, or if you have other ideas for how you've used a similar visual in your classroom!

Tuesday, July 7, 2026

Things to Make This Summer for Your Music Room Part 2

I love a good craft project in the summertime! And while I definitely make time to unplug from all school-related thoughts over summer break, I also have a list of things I've wanted to make during the school year but didn't have the time or energy to put together that I like to tackle over summer break. I made a list of some of my favorite items I've made for my classroom over a decade ago so I decided it's time for an update! Here are some of my favorite summer craft projects I've made to use in my elementary music classroom.

music truth or dare card/ jenga game

This is such an easy thing to make- just print out the cards, cut and glue them onto some construction paper, and laminate them, and you've got yourself a review game that will get students practicing all kinds of music skills and concepts in a way that truly will have them begging to play again and again, and you can use it with the whole class or as a center! You can leave it at just the cards or take it one step further and add a jenga set to the mix for even more fun. Here are the printables, and here is the full blog post on how the game works:

rhythm composition cards

I truly use these all the time with every grade 1st-6th and they are so helpful! It's a simple concept but works so well for helping students visually see the note values: take some foam sheets, cut them into strips, and then cut them into lengths that correspond to the number of beats in the note/ rest and write the symbol on the card. Here is my blog post with all the details:


poi

One of my most recent DIY's was the poi I made from just some rope. I've used them for 2 years now and they have held up great and still look like new, and the bright colors are so cool when my 2nd graders use them for their performance in our annual International Music Festival! It took me a while to figure out how to do the first one, but once I got the hang of it the rest of them went pretty quickly- this is the perfect summer project because you can mindlessly make them while you watch a movie :) Here is the full blog post with a tutorial video on how to make them, and how I use them in my lessons, especially in my unit on Maori music from New Zealand.

discbound teacher planner

Putting together your own teacher planner is the definition of the perfect summer project. I know a lot of teachers are intimidated by the idea of printing your own pages and putting it together yourself but seriously, there is no way to get a more perfect-for-you planner that you'll actually use, and save the most money because you'll only buy the supplies once. Here are the music teacher planner printables and here is my post on how I put mine together:

kindergarten learning target visuals

When my district started requiring us to post learning targets for every class with every grade, I laughed at the idea of writing long sentences on the board to go over with my Kindergartners who couldn't even read yet. These visuals have made it possible for me to actually post learning objectives in a way that actually benefits student learning, but they have also really helped a lot of students grasp concepts more quickly by seeing them represented in graphic form! I highly recommend these, they really do make a difference. Here are the printable cards, and here is the blog post with the full explanation of how I use them: 

musical memory matching games

These are another easy project that just takes a little time to sit down and complete: print out the cards, cut and glue them to construction paper, laminate, and you're done. The game is played the same way a traditional memory matching game is played: players take turns flipping over 2 cards, one at a time, to try to flip over a matching pair of cards. If the 2 cards match they keep the cards, if not everyone tries to memorize their position and the player flips them back over. The player who collects the most pairs wins the game. But in this case students are not looking for cards that look exactly like each other, but pairs of cards that match, like a picture of a note G on the staff matching with a card with the letter G! I made mine myself but you can find plenty of options for musical memory matching game printables on teacherspayteachers for all kinds of vocabulary and concepts here.

I hope this helps give you some inspiration, or maybe even remind you of a project you had thought about and forgotten you wanted to do! And don't forget to check out my first post on summer craft projects for even more ideas!

Tuesday, September 20, 2022

Posting Lesson Objectives

Today's post is a simple one: after getting several questions about my lesson objectives boards I realized I never specifically explained them anywhere on my blog! If you're looking for a simple way to post lesson objectives or "I can" statements for multiple grades, here's how I do it.

This post contains affiliate link(s). This post is not sponsored.

This is perhaps one of the easiest DIY projects I've ever done: I teach seven grade levels, so I went to the dollar store and got seven picture frames, then got scrapbook paper in seven different colors. I cut each piece of paper to the size of the frame, put a sticker in the corner to indicate the grade level, and stuck it inside the frame instead of a photo. Ta-da! 


Over the years I've changed out the poster above the frames, and added one of these pen holders to keep a dry erase marker nearby, but the frames have stayed the exact same for almost a decade now! Actually the color paper I ended up choosing for the frames have become my designated colors for those grade levels in everything else: in my lesson planner, drawer organizer, grade level expectation posters, etc. So they may seem small and insignificant but they have had a big impact!

I like being able to write the objectives in dry erase instead of printing out signs and posting those, because it's much quicker for me to handwrite and I can add/ remove/ tweak things more easily as I go. And I know some teachers like to have the objectives in their lesson slides, but I've found I prefer having them posted separately somewhere where any administrator can see them no matter when they come in my room, and students can see what other grades are working on (they do sometimes comment on that, actually).

I hope this helps you if you're looking for an easy way to post your objectives in your classroom! If you want to see what the rest of my classroom looks like, here's my latest classroom tour for the 2022-2023 school year. And if you want a copy of the poster I have above the frames (and any of the other coordinating posters I use all over my classroom), you can find it in this set with the rules and procedures posters.

Tuesday, October 27, 2020

Schedule Dashboard for Teacher Planners

My schedule this year looks nothing like it ever has before, and keeping track of where I'm supposed to be when and doing what has been an unprecedented challenge! This planner addition has been a life-saver for me this fall and it has proven to be even more versatile than I ever imagined.

This year because we are on a rotational schedule where we see the same 2 grade levels for 3 weeks and then switch, my schedule is the same every single day, and I'm essentially teaching 2 lesson plans each day. So while I don't need to re-write my lesson plans for every single 2nd grade class with the same lesson plan, I do need a way to keep track of what my schedule is- I am teaching both full distance learners on zoom and in-person cohorts simultaneously, and going into different rooms around the building on a cart.

Rather than writing out my schedule each day, I wrote out the times, locations, and formats (in person, online, or both) for my classes and printed 2 copies front and back, laminated, and hole punched it so I can keep it in my planner and move it from week to week to reference. I've also been using it to keep track of my schedule during the day by sticking it to the side of my cart with a magnet. Double duty! Having it as a reference has saved me many times.

Here's a video showing it in more detail:


If you have a crazy schedule this year like mine, I highly recommend this simple DIY- I've found it so helpful! If you're looking for the planner printables I use, you can find those here. Looking for more tips and ideas for teaching in a hybrid model? You'll find lots more posts on this page:


Monday, April 30, 2018

The Power of Positive Visuals

I'm not much of a touchy-feely person. I tend to be skeptical of anything that seems fluffy or ignorantly positive. But I have come to appreciate the power of positive visuals and the influence it can have on my mood and motivation in a very real way, and today I wanted to share some of my favorite ways to incorporate them simply and effectively into my daily life.


It all started with a quote that really struck me. I knew I wanted to be reminded of that thought often, so I stuck some paper inside a dollar tree picture frame to make my own dry erase board, wrote down the quote, and hung it by my front door. When I came across a new quote, I erased the previous one and wrote down the new one.


When I moved into my new house, I was looking for easy ways to decorate my bedroom and make it more colorful, and picked up a scrapbook paper pad with colors that coordinate with my bedding. In that paper pad were a few pages with large quotes, and one of them had both a great message that I wanted to wake up to, and was visually appealing as wall art. So I modge-podged it onto some cork board and hung it on the wall in my bedroom:


As I started playing around more with my planner decorating, I started incorporating other pieces of scrapbook paper and stickers with inspirational quotes that I anticipated I would need to be reminded of that week. I even made some of my own (see them here) that I printed, cut, and glued into my planner. Since I look at my planner multiple times every day, I figured I should use the space to help keep me in the right mindset!


All of these are very simple but have had a positive impact on my mood and mindset as I go through my day- it's amazing how powerful a simple image can be!

Get inspiration and ideas sent straight to your inbox! Click here to sign up for the Organized Chaos newsletter!

Monday, November 6, 2017

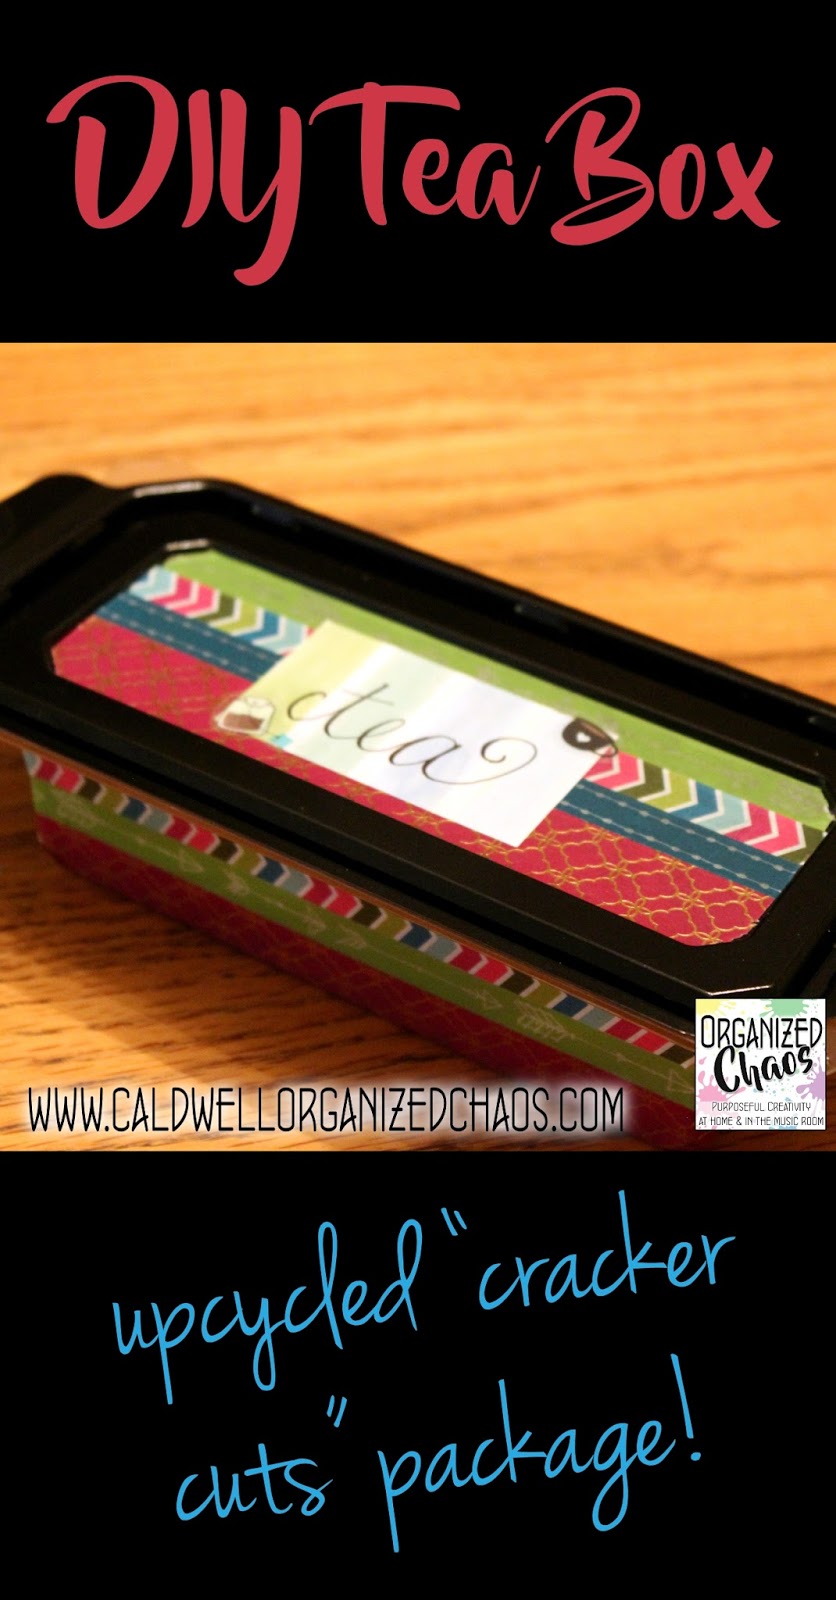
DIY Tea Box

It's been a while since I shared a quick and easy DIY project, so I'm excited to have another fun one to share today that's perfect now that the weather is getting cooler: a DIY tea box! Even better, this is a simple way to upcycle something you would otherwise throw away, so it's a great way to do a little planet saving too :)


I am a hot drink lover. Whether it's hot chocolate, coffee, or tea, I love it all! So naturally I have a bit of a tea collection in my pantry. That's all well and good when it's just me, but when I have guests over it can be pretty cumbersome (and overwhelming) to pull out 10 different boxes just to offer them a drink! This tea box solves that problem.

Another thing I love are those "cracker cuts"- cheese that is pre-cut into squares. They are so easy to pack in lunches and they're great to put out as a no-fuss appetizer or a quick snack after school. So I started accumulating these nifty long, rectangular plastic boxes that the cheese came in- I knew there had to be a way to reuse them!

Turns out, they are a great size for tea bags:


Besides the nice shape, these boxes also have a pretty good seal on the lid, so I can keep some of those tea bags that aren't individually packaged in there too- I just cut out a piece of the box so I know what type of tea it is, and stuck a few of each tea behind the cutout.

Honestly if you don't care about aesthetics, you could just rinse out the box, flip it over, and throw some tea bags in there. But of course I wanted mine to look a little more fun, so I cleaned off the original label and stuck some washi tape around the outside and on the lid. I put a few stickers on the top to write the word "tea" on the lid, and that's it!

I'm happy to have this little box on hand for the next time I have people over! Now to find some people to invite...... ;)

Join the Organized Chaos family- sign up for the newsletter right here!

Monday, September 18, 2017

Visual Calendar for Elementary Age Kids

With so much out of their control, and with schedules changing each day, having a visual calendar is really helpful for young children. Ever since I made my first one for my 2-year-old daughters 3 years ago, we have been using the calendar to track their daily schedule every week. A few months ago I shared how I had updated the other parts of the magnetic board I have for the girls, including a simple to-do list and a monthly calendar. Now that the girls have been in Kindergarten for a few weeks, I have a better idea of what kinds of things are most helpful to track on their calendar. Today I wanted to share what I'm including on their updated visual calendar, along with a free download so you can make your own for your elementary age kids!


Now that the girls are older, their schedule (and how they think about their day) has changed quite a bit. They don't take as many naps, but they need to keep track of field trips, specials, and other school events. They also have more play dates and extra-curricular activities.

For school, I made some magnets that show their "specials" classes: music, art, PE, and library. I also made some computer magnets for when they eventually start having computer lab time and standardized tests (sigh). I also added some magnets with school busses to show field trips,. My daughters' school is on a rotational schedule so I also made magnets with the letters A through E to indicate the rotational day. Since my daughters are in different classes, I wrote their initials on each of the specials and field trip magnets to indicate who has what. 

For home, I added some new magnets too: play dates, dentist, doctor, and haircut appointments, and parties (which I'll use for parties and celebrations at school or outside of school). I'm also still using the ones that show when their meals are, because it's easier for them to keep track of what happens when that way, and the ones with pictures of family members' faces- with going between 2 houses and visiting extended family, it's nice to have those printed so they can see who they'll be with.

Making the magnets is easy! I printed out the icons I wanted with a grid marked off on letter size paper, then stuck it on these adhesive magnet sheets and cut along the lines with regular scissors. Done! If you want to make some for yourself, download the PDF here (I've included a blank one so you can make your own in the same size if you want). I use an auto drip pan for my board, but if you're just making a weekly visual calendar you can use any regular cookie sheet instead!

I hope you can use these to make your own visual calendar for your elementary-age children! If you do, I'd love for you to send me a photo through email or by tagging me on social media :)

Stay in touch! Sign up right here for the Organized Chaos Newsletter.

Monday, August 14, 2017

Craft Supplies for Home Decor: paper cutouts

I hope you've been enjoying my little series on using craft supplies to make easy, cheap, home decor! Today I have a few simple projects using paper cutouts. I've used paper flowers for all of these, but if you go to your local craft store you'll find paper cutouts / die cuts in all different shapes and colors (or of course you could make your own). These are all great ways to spice up boring things and add a personal touch to your space :)


First of all, if you're not sure what I'm talking about when I say paper cutouts or die cuts, here's what I'm talking about:


I often find them on clearance in craft stores, and there are always different seasonal sets, like fall leaves, or even different animals (which would be so cute for a kid's bedroom or playroom!).

The first project is one I've shared before: adding some flowers to the top of push pins. For these, I took 2-3 flowers in different sizes and layered them on top of each other, putting a tiny blob of craft glue in the middle of each one to attach them. I love these! They add so much color to my bedroom wall. Click the picture to read more about that project:


The next two projects are new (and I'm more than a little excited)! I recently updated my daughters' bedroom in their requested fairy garden theme, so I pulled out the paper flowers again for a few projects :)

The first was simple: add a longer pull to the ceiling light switch! I tied some string I had on hand around the short metal pull that came on the ceiling light so that it hung down low enough for the girls to reach. At the bottom of the string, I attached 2 layered (as in the previous project) flowers, sandwiching the string, with a little gemstone in the middle of each flower. Isn't it adorable? And so much easier for little hands. The girls can't stop turning the light on and off ;)


You may have noticed the second project in the photo above: DIY flower bed canopies :) I got these plain bed canopies from IKEA and, as before, made a whole bunch of layered flowers with the tiny gemstones in the middle. Then I used the same craft glue to sandwich the net between two sets of flowers (so that they look nice from the inside or outside).


Aren't these fun? And so easy :) I hope these ideas give you some inspiration for your own projects. Have you used die cuts / paper cutouts for any of your own home projects? I'd love to hear your ideas in the comments! And if you haven't already, be sure to check out my previous posts from this series on using washi tape and scrapbook paper for DIY home decor ideas :) Want more? Sign up here for the Organized Chaos Newsletter and I'll send ideas and resources straight to your inbox!

Monday, August 7, 2017

Craft Supplies for Home Decor: Paper

Scrapbook paper has got to be one of my favorite things! And it is wonderfully easy to use in so many different projects, even home decorating. If you missed it, last week I shared my favorite ways to use washi tape for home decor. Today we're talking about my favorite home decor projects using paper! These are all easy and budget-friendly, so I hope you'll give some of these a try!


I've shared quite a few home decor projects using scrapbook paper over the last few years! Most of them are what I call "functional art", meaning they serve as organizational tools, but because of the pretty paper, they're also decorative! ;) Here are some of my favorites (click on the picture to visit the post and see how I did them):

1. Dry erase organizers


2. Magnet boards


3. Corkboards / wall art


The other project I want to share with you is not mine- it has been on my list of "future projects" for a while now but I'm waiting until I can finish a few other projects first: drawer lining! For kitchens and bathrooms I plan to put clear contact paper over the top of the scrapbook paper, but for other places you can just use the paper as-is. So fun! There are tons of tutorials on this project, but this one from "In My Own Style" is my favorite:


That's about it for home decor projects using paper! I hope you found some new, simple ways to personalize your home. Have you done any home decorating with scrapbook paper? I'd love to hear your ideas in the comments! :) 

Stay in touch! Sign up here for the Organized Chaos Newsletter and I'll send more ideas and resources straight to your inbox.


Monday, July 31, 2017

Craft Supplies for Home Decor: Washi Tape

Raise your hand if you've ever used craft supplies as home decor! I've found that many craft supplies are also perfect home decor items- they're generally cheaper than buying pre-decorated items, there are infinite color and pattern possibilities, and in most cases they're easy to change out if you're renting (or just flaky). Plus if you're like me and already have a craft supply obsession, this just gives you another excuse to buy more pretty things! ;) Today I'm kicking off a series on using craft supplies in the home with my favorite item: washi tape!


I've actually shared quite a few ideas for using washi tape in the home already, so I'll share those posts below for you to see more detailed ideas. But the applications are probably pretty obvious: washi tape is a great cheap and temporary way to add colors and patterns to almost any surface. And of course you can use it to attach things to other things, like hanging (light-weight) pictures on the wall. Click on the images below to see some of my favorite projects:

Disclaimer: some of these posts are OLD! No judging my beginner photo skills from years ago! ;)


Washi Tape Gallery Wall:

Mail Sorters:

I hope you found inspiration for some new home projects! How else have you used washi tape in your home? I'd love to hear your ideas in the comments below!

Stay in touch! Sign up here for the Organized Chaos Newsletter and I'll send more ideas and resources straight to your inbox.

Monday, June 19, 2017

DIY Visual Calendar for Kindergartners

Summer is the time for home projects! I've been itching to update my daughters' visual calendar now that they've graduated preschool and are headed to kindergarten in the fall. If you have any children who thrive on predictability and routine like mine, this project is really quite simple and has been a really helpful tool for several years now in our house!

*this post contains affiliate links*

I've been using a visual calendar at home with my daughters since they were 2, mostly because of one of my daughters who was (and is) very resistant to change and likes to anticipate what is coming next. When I first started using it, I had a weekly calendar at the top and a chore chart just underneath. Over the years I've gradually changed the board to reflect the information that the girls needed for their ages, and I've made a few more changes to get ready for elementary school! First, here's what the whole board looks like:


The main weekly calendar at the top of the magnet board (aka car drip pan) is staying pretty much the same. I first started using a visual calendar when the girls started daycare, primarily to help them see when they would be with the daycare provider, when they would be with their dad, and when they would be with me, so I basically had meals, nap and bedtimes, and when they switched caregivers on the schedule. When they started preschool, I took pictures of their school teachers to indicate when they had school and also added a monthly calendar.

With kindergarten on the horizon, I started thinking about which items the girls would want to see on their schedule. I made a few new magnets to use in the fall:


I made some magnets for field trips, their various specials, and the rotation day for their school schedule, and I got rid of the napping magnets (so sad!) and the preschool teacher magnets. I've decided that for elementary school, I'll just put up the letter day of the rotation rather than a picture of the teachers.

The section just below the weekly calendar is brand new- I made a couple of simple to-do checklists with each girl's name at the top (names are blocked out in the photos). I figure it will be a good way for us to keep track of homework assignments and other to-do's each of them needs to do throughout the week. After printing the checklists, I stuck them onto the board and covered them with a single-sided laminating sheet right on top to make it dry erase.


Just below that, I've moved the monthly calendar (which I added when they started preschool) to the side to make room for another magnetic clip. I am planning to keep any papers from school etc that we need to keep track of there, whether it's information about an upcoming field trip, homework assignment, or lunch calendar. Now that the girls can write, they do the majority of the monthly calendar themselves- read more about how we use that for memory keeping and planning ahead in this post.


Having a visual calendar has been really helpful, especially with my daughters' schedule between two houses, and it has been fun to see the girls gradually take on more responsibility in putting together their calendars and have more of a sense of ownership through the process. If you want to see how the calendar board has evolved over time, from toddler to preschool to now, or if you want more details on how I made the original board (very cheap and easy!), check out my previous posts below:


If you're wondering where the chore chart went, I now have a family chore chart in the kitchen instead- read about that in this post. I guess we're actually getting ready for elementary school now! If you have any ideas for how to help elementary age students anticipate their schedule and keep their assignments and to-do's organized, please leave a comment below- I'd love to hear them!

Want more? Sign up right here for the Organized Chaos Newsletter and get more ideas and resources sent straight to your inbox :)