Image Map
Showing posts with label Closet. Show all posts

Monday, July 17, 2023

Family Craft Supply Storage

As the mother of two elementary-aged children and a crafter myself, one thing we have a lot of in my house is craft supplies! When we moved to our new house, one of my top priorities was the re-organize our craft supplies in a way that made sense for our family and how we use things, taking into account how much older (and therefore more capable and independent) my daughters are now at 11 years old. I still have more to do to get everything the way we want it, but today I'm sharing my progress so far- I'm really happy with our new setup!

This post contains affiliate links

When we first moved in I was hoping to use our hallway closet- presumably intended to be used for linens- as our centralized craft storage closet. But once I started organizing everything I quickly realized there was no way everything would fit! So I shifted strategies to sort our craft supplies into categories: items only the kids would use, items we would all use, and items only I would use. The common items I kept in the hallway closet, the kids' items I put in the girls' shared play area closet, and my remaining items I'm not quite ready to share yet (mostly my planner stickers and washi tape) in my room. 

The kids' craft storage is actually half of the master bedroom closet. Our new house doesn't have a specific "play room" like we had with our old basement, so we designated the master bedroom to be half one daughter's bedroom and half shared play space. One side of the closet is my daughter's clothes closet, and the other side is now the storage for their toys and craft supplies:


The girls have a lot fewer toys now, so a lot of the bins in the bin organizer now hold craft supplies, and some of the spots in the hanging shoe organizer have additional craft supplies as well. The majority of the supplies, though, are stored in the IKEA bins on the rails that we attached to the back wall of the closet. I cut out pieces of clear contact paper and wrote on them with permanent marker to create simple labels for the bins that we can change out whenever we need:


The hallway closet has a lot of the specific categories or projects that we use together, like sewing tools and fabric, paint and glue, tie-dye, beads and jewelry making tools, and scrapbook paper. For categories (like paint and glue) or specific projects (like tie-dye) I grouped them in clear bins with labels on the front so we can all see what's inside and find what we need. 


As a scrapbooker I have a bit of a paper problem and had an absolutely ridiculous stack of paper pads that were getting bulky and difficult to sort through in the drawer I had them in before- I knew I needed a way to store them vertically to make it easier to look through everything, and I knew I wanted to consolidate everything by color and coordinating sets to make it easier to find what I want rather than flipping through every single paper pad, especially since I had a lot of pads that I had used up a lot of the sheets. These clear paper organizers have been a game changer! For the paper pads that have specific coordinating patterns I like to use together, I took out the remaining pages and put them in a bin together where I can more quickly see the paper inside. For the rest of the paper, I took everything out of the pads and reorganized them by color. It is so much easier to find what I need now, and for the girls to use it as well (this video shows a quick tour around both closet spaces, and a closer look at the paper organizers)!


There will definitely have to be a part 2 to share more of my craft storage- I still have more to do to set up my personal craft supplies in my bedroom/ office space as well- but I'm really happy with how things are coming together so far. Our new setup makes so much more sense for our family and how we use things now! 

Do you have any craft supply organization and storage ideas you love? Which supplies do you find most difficult to organize? Leave your suggestions in the comments below!

Monday, June 19, 2023

Bedroom Storage & Seating Upgrade: Yaheetech Storage Ottoman Bench

So I recently moved into a new house and that means a fresh opportunity to organize and design every part of my house- I cannot wait to bring you along as I look for ways to set up our home in ways that are functional and aesthetically pleasing on a teacher budget and a busy mom schedule. I had to start off with my favorite addition to my bedroom that I am completely obsessed with, that serves as both a comfortable and stylish seating option and hidden storage: the Yaheetech storage ottoman bench!

I was sent this item for review. All opinions are completely my own. Affiliate links do not affect price or purchase experience.

Because I am a single parent of 2 children, I have never actually been the one to use the master bedroom, and this time is no different. The size of my room is about the same as my previous house, but unfortunately I lost a LOT of closet space- in fact my new closet is half the size of my old one. That meant I had enough room for my hanging clothes and drawers, but no way to keep the shelving unit I had in my old closet behind closed closet doors. You can see how I had my old closet set up in the picture below (and click on it to read the full post of what I used and how I set it up- it worked really well for me!).


Initially I assumed I would just keep the shelving unit in the room, just not in the closet. But I quickly realized that meant having bins labeled as "underwear" and "socks" out where everyone who walks in the room can see it... I didn't think I would care, but I did. It just felt weird. Plus it was just not the calming aesthetic I wanted for my bedroom... See what I mean?


Enter the storage bench. Not only did it give me a place to store the clothes I had in the shelving unit in a way that was hidden from plain sight, but I didn't need labels because when I open the bench I can see the contents. Using some smaller bins I had on hand from when my daughters were toddlers, I was able to divide up the storage space inside and fit the contents of what ended up being not just the 3 bins in the picture but 5 of those bins- I added the PJ tops and bottoms in as well.


Now it's easier to get everything in one place instead of pulling out all different bins, it's more compact, and it looks nicer in the room! Not only is it functionally a better storage option, but it adds a beautiful window seat with a small footprint that doesn't take up too much valuable space in the room:


My room looks so much more sophisticated and comfortable just by adding this one piece. And now that I freed up that space on the shelving unit, I can style the shelf to also look more sophisticated and use it to store other items like my craft supplies as well as add some decorative pieces- I have lots of ideas I'm working on but I used what I had on hand to try out what it could look like:


So much better already! I can't wait to play around with the shelving unit now- I will be sharing what I end up doing with that soon. But the best part about the bench, in my opinion, is that it is super inexpensive without compromising on quality. Most storage benches are super expensive- most of the ones of this quality are hundreds of dollars, so I never thought I would be able to afford a new one on a teacher budget- but this one is well under a hundred. And judging by the price you would think this would be cheaply made, but this truly is not. I used to have a storage bench I got off of craigslist in my old entryway that I thought was amazing, but it was super dangerous for little fingers because the lid didn't stay open. This one has solid hinges that stay open at any height- no more gingerly holding the lid open with one hand while trying to grab what I need with the other!


Oh, and one more thing I love: assembly is so easy and quick. I normally hate buying furniture new because it means I have to put it together. If you've ever bought something new from a certain Swedish furniture company you know what I mean... *cough* so I was a little worried when I opened the box. But all I had to do was screw in the legs- it seriously took me 5 minutes and no tools at all! Score!

Thank you to Yaheetech for sending me this bench- I love it and I HIGHLY recommend it for anyone looking to add style and organization to any room of your house on a teacher budget. And they have tons of other beautiful, practical, and budget friendly items I have my eye on as I continue to set up my home- you can check out their website here to see everything they have to offer. If you have never heard of their company before here's a little about them:

Yaheetech is a cross-border e-commerce company established in 2003 with more than 500 employees worldwide. With our own 39 warehouses around the world, we provide a wide range of products with fast delivery to millions of customers in more than 10 countries, available on Amazon, Walmart, eBay, Wayfair, Wish, Cdiscount,  ManoMano, OTTO, Rakuten, Real and more. We devote to make your life comfortable.

I can't wait to show you the other home organization projects I've been working on! Which space do you want to see next? I will be sharing more home organization posts this summer, along with my teacher content, as I find creative ways to organize everything in ways that work for our busy family without breaking the bank. Stay tuned!

Monday, January 1, 2018

Fresh Start 2018 Challenge: closets

Happy 2018, everyone!

In past years, I've updated and shared my Fresh Start Checklists just before New Year's each year so I can get the important things at home and school in order and get excited for the year ahead. This year, I felt like I needed a bit more of a thorough refresh at home- things are starting to pile up, projects are getting put off for months and months... But the reality is, school starts tomorrow and I don't have time to get everything spick and span before I'm knee-deep in school work again!

Over the next few weeks I'm going to be sharing the small but impactful ways I'm challenging myself to tidy up, purge, and clean up at home. These tasks are designed to be manageable with school back in full swing, but still make noticeable progress toward a refreshed home. If you want to join me in any of these challenges and/or help keep me accountable, stay tuned until the end of this post to learn how you can join in the fun over on Instagram and share our progress together!


This week's fresh start task: go through your closet (and your family members' closets) and pull out anything you don't need anymore.

It's time to get rid of any clothes you haven't worn in 2 years, things that don't fit, or things that you just don't feel good wearing anymore. If you're in a purging mood, take them all straight to the local Goodwill or Salvation Army. If you find you're hesitant to get rid of all or some of the things you pull out, try putting them in a box and keeping it in the attic or basement for 6 months or a year. If you don't miss them, you'll probably be ready to get rid of them at that point!

This is my realistic #teachermom version of the "konmari" method and capsule wardrobe idea: I'm not going to pull everything out of my closet to contemplate each item, but I am going to consciously look at each thing and err on the side of pulling out too much rather than too little- if I'm not sure if I should keep something or not, I'll put it in a bin to keep in storage for a while to see whether or not I ever choose to go pull it out.

Remember, the goal is to only keep things that:
  1. have been worn in the last 2 years
  2. fit well
  3. I like
For my daughters' closet it should be an even faster process- because they outgrow things so quickly they don't have a lot of extra clothes laying around in their closet. I am often pretty bad about going through their socks and underwear to throw away old ones and make sure they have enough that fit, and sometimes I'll find something in their closet that's out of season or that no longer fits. So the only part that will be different when I go through their closet will be to also see if there's anything new I need to get, especially socks/underwear. Otherwise the process is the same as for my own clothes.

I'm giving myself a time limit so that this doesn't become an overwhelming, drawn-out task: 30 minutes for my closet, and 15 minutes for my daughters' closet. See, that's not so bad!

Bonus: I'm pretty happy with how my closet, and my daughters' closet, is organized. If you want to get a better idea of how I organized everything in each of our closets fairly cheaply (mostly with IKEA organizers) and made them easy to maintain, check out each of the posts below (it has totally been worth it having things organized!):


If you don't have your clothes organized in different bins or drawers, I highly recommend you find a way to do that- it will make a huge difference in your ability to keep things where they're supposed to be (and find things when you want them)!

Want to join me in this Fresh Start 2018 challenge? I'm going to be posting a photo on Instagram on Sunday of what I accomplished for the challenge this week. If you want to join me, share your own pictures and include #FreshStart2018Challenge in the description. You don't have to stick to any schedule either- join me any time! The goal is to get a cleaner, more organized home without the guilt or stress.

Here's to a fresh start for the new year!

Click here to sign up for the Organized Chaos newsletter!

Monday, January 23, 2017

My Top 3 Tips to Help Make Laundry Easier

I know some people despise laundry. I don't hate it, but it's definitely a nuisance, mostly because it's such a time commitment, what with the loading, stain removing, unloading, drying, folding, and put-awaying. Since having my twin daughters my laundry loads have obviously gotten way bigger, and I've developed a few ways to help make laundry a little bit easier and the process a little faster.

*this post contains affiliate links*

1. Easily accessible supplies

My very first "home/parenting" blog post ever was this tip: stick a pen holder on your washer or dryer to keep stain removers handy! Click on the picture to see that post (remember, it was one of my first posts ever.... it's uh, not fancy):


When I wrote that post, I was in a 2-bedroom apartment with my stackable washer and dryer in a tiny closet next to the kitchen. Although space was definitely tight, it was really nice having everything so close by. Now that I've moved into a house, things are much further away from each other, so having everything I need right there in the laundry room became even more important. One of the biggest downsides of my laundry setup in this house is that there is no sink anywhere in the basement where my washing machine and dryer are, which makes it difficult when I need to work on stains or rinse something out. Enter my latest solution to keep things nearby: a drink dispenser. These slim kinds are cheap and I've seen them at several stores (I picked mine up at Walmart, but this one looks very similar). I love it because it takes up very little storage space but holds a good amount of water. I've had mine for several months and haven't had to refill yet. Pair that with a bowl and voila! No need for a sink!


2. Reusable dryer sheets

I shared these recently in my post on 5 Eco-Friendly Ways for Busy Moms to Save Time and Money- they are great time-savers because I never have to take them in or out of the dryer! I don't even think about them! It's just one less step I have to go through every time I do laundry.


3. Organized closets

This last tip saves me a lot of time in the sorting and putting away after the clothes are cleaned: having our closets organized so that it's easy for me and my daughters to know where to put everything has made it so much easier and faster to put clean clothes away! My favorite thing about our closets is that every type of clothing has its own bin. We can all quickly find our items and throw them in the right bin. Click on each picture below if you want to read my previous posts on how I set up my closet and my daughters' closets. My girls have been putting their own clothes away since before they turned 4, which is awesome for me!


I hope you found at least 1 small way to help make your laundry time a little bit quicker and easier! How much do you love or hate laundry? What are your favorite laundry tips? Let's hear them in the comments! :)

Get more ideas for home and school! Click here to sign up for the Organized Chaos newsletter!

Tuesday, November 1, 2016

Organizing Your Teacher Closet On a Budget (part 2: sheet music)

This past summer I was forced to take a long, hard look at my classroom closet because they had to re-do the floors. One of the biggest projects I tackled was re-organizing my choral music collection. Although it doesn't look very pretty or even new and shiny, I am happy with the organizational system I came up with- it has been very functional and I spent $0 on it! If you have a collection of sheet music and a small budget, you can take these principles and apply them to the materials you have on hand to get everything organized!


When I came to this school, I had a very difficult time finding any sheet music to use for my choir concerts the first year. All I could find were haphazard piles of dusty old 60's pop song arrangements, so I survived my first year creating my own arrangements of songs I found or knew. Which brings me to my first point:

organizing sheet music is important because if you don't, you won't use it, and that is money down the drain!

If you don't know what you have, or can't find the type of music you need when you need it, you'll never use the stuff you have (no matter how good the material is).

The first step when I went through the sheet music this summer was to get rid of decades-old photocopies of outdated music, duplicate copies of trendy/pop music from more than 10 years ago, and other materials that were just in too bad of shape or too out of date to be useful for me or any teacher after me. Although I was tempted to throw away much more, I am always aware that what I think is too cheesy or in poor taste may be something another teacher will value-

don't throw things away based on personal taste. Sift through the collection based on physical condition, educational value, and stylistic variety.

As I went through all of the sheet music to throw away things I didn't need, I also started sorting it all into categories. I based my categories on what I will need to search for when I'm looking for new material for my choir groups.

Organize sheet music based on the elements you need to search for (genre, difficulty, voicing, theme etc) for your ensemble(s). 

For me, this meant primarily organizing by theme. I currently have two choral groups at my school: one for 3rd and 4th grade and one for 5th and 6th. Although I obviously need more challenging music for the older students, for the most part the voicing and difficulty I need are similar for those two groups. However, I currently do 2 concerts a year (I know, it's OK to be shocked): one in December which is generally centered around the winter holidays (without being overly religious) and one in the spring, which has for the last several years been centered on the theme of "around the world". This means I am most often looking for winter/holiday music and music from cultures around the world. I started with those categories and then separated everything else into thematic/genre groupings as well.


Once I had everything in categories, I used a combination of old magazine holders and giant manila envelopes to hold everything within their groups, making sure to label each category. For the categories that didn't have as many pieces, I put them together in one magazine holder, with each category having its own envelope. You can't see the titles from the spines of most sheet music like you can with books, so you're going to have to take things off of the shelf to look at it anyway.

The last step was to add one box that I labeled "current". I use this space to hold music that I've done in previous concerts that I liked (in case I want to re-use them in a few years) and music that I've found that I've considered but haven't used yet. Obviously the music I am currently teaching to my choirs is out with my other teaching materials, but this makes it a whole lot easier when I'm looking for material for the next concert: I already have stuff pulled out that I liked before to look at that fits the themes of my 2 concerts.

Create a separate place to store music you've done in the past with current groups, and music you'd like to consider for future concerts, so you can find new material for your ensembles more quickly.

How do you organize your sheet music? I know many people have much larger collections and juggle a lot more different ensembles and performances, but I hope the ideas behind my organizational system will help you to think through your own systems as well! If you have other ideas that have worked for you, please share them in the comments :)

This post is "part 2" in my series on organizing your classroom closet. If you want to see my first post, which was on organizing small items like composition manipulatives, click below:


Want more? Subscribe right here to the Organized Chaos newsletter to get ideas and resources sent straight to your inbox.

Tuesday, October 18, 2016

Organizing Your Teacher Closet on a Budget (part 1: small items)

How many teachers have impeccably clean, organized, streamlined classrooms, but have mountains of disorganized junk just behind their closet doors? It's hard to keep a classroom closet organized. As elementary teachers we have so many little things that we need to have on hand but don't use year-round, and we often need to get them out of sight quickly and end up just throwing things in the closet without having time to figure out where it goes. I've recently come up with a few new tricks for organizing my materials in my classroom closet that have helped me maintain the organization through the last-minute pulling stuff out and putting stuff away, and I'm really excited about how well they're working (and how easy they were to implement)! Today I want to share what I'm using to help organize all of those small items- manipulatives, game pieces, etc- that need to be organized and easily accessible in my closet.

I have a few large shelving units in my closet. I'm grateful to have the storage but big shelves are definitely not generally conducive to storing the types of things I need to keep in my closet, which are mostly small items that will quickly get buried and mixed up on a large shelf. They key with organizing small items in larger spaces, whether that's a drawer, counter space, table, or shelf, is to get smaller containers. The problem is that we as teachers need LOTS of containers if we're actually going to organize all the little things we have, and that can get expensive. Here are some of the cheap items I found that are working perfectly for my closet!


The best things to use, if you can find them cheaply, are drawer organizers. I found mine on super-clearance at Marshall's- any discount store with home items, or dollar stores, or good places to keep an eye out for these (mine were $2 for each set so I spent a total of $6). The nice thing is you get lots of small bins in one, usually in different sizes, and often you can arrange them in whatever configuration best fits your space. I am using these for my composition manipulatives (like lego blocks and mini erasers), solfege stickers, and game pieces for some of the games I use for centers


Another great solution that I just recently came up with is the mini accordion folder that I got at the Dollar Tree (I've seen them at other stores like Walmart as well for the same price). I saw this rainbow one last year and bought it, knowing I would eventually find some use for it (although I didn't expect to wait a whole year to come up with a great way to use it...). I've now organized all of the small card decks that I use for centers and class activities, especially to review note names and instruments (most of which I made myself). I also have decks of cards that I got at the Target dollar spot that show musical instruments and flags from around the world- I use these for simple sorting activities in centers and small groups. I had previously had them stacked up in piles on the shelf, and I always ended up knocking over the piles and getting the decks all mixed up with each other. Now I can quickly slip them into their own slots and pull out just the ones I need without getting them mixed up! 


I bought these dip trays at the Dollar Tree to use for sorting activities (like the ones using the decks or cards I mentioned before, where students sort the instrument cards into families of instruments, or sort the country flags into continents etc). When I use them for sorting, I write the category names on the different compartments with wet erase marker and then wipe the off afterwards so I can reuse them. I recently, however, figured out another great use for them when they are sitting in my closet: sorting individual sets of manipulatives! When I am going to be using composition manipulatives in class, I usually need to have several sets of the same items so individual students or small groups can each have the same set of materials to use. When I'm getting ready for a class using them, I pre-sort the items in the dip tray so that I don't have to dig through the pile of lego blocks searching for one more pink one while I'm teaching. It's also great because I can just bring out the tray for that class and put them back in the closet, still sorted, until the next class when I'm using them again. Once we're done with that set of lessons, I can dump them back into the small drawer organizer with all of the legos so I can quickly find them again next time.


I've been very happy with how well my system is working so far this year, and I hope you've found some inspiration to help you cheaply and easily organize your own classroom materials. If you're curious about the items that I mentioned, check out the other blog posts that I've linked in the descriptions above- I love having these materials to use and they are also cheap and easy to get! :) Have your own organization tricks to share for keeping your classroom closet organized? Let's hear them in the comments!

Want more? Subscribe here to the Organized Chaos newsletter to get ideas and resources for organization, lesson plans, and so much more sent straight to your inbox!

Monday, July 4, 2016

closet organization updates

I'm back with another recent update to my bedroom: my closet! I'm so happy with how much better my closet looks and functions with the simple updates I've made. Today I want to share my updated, streamlined closet with you, along with some tips for organizing your own space!


OK, so let's start with a "before" picture:


(Notice I made sure to plaster the word "before" all over this picture.... The haphazard mountains of clothes and exploding bins strewn on the floor still make my eye twitch....)

This may be hard to believe but I actually lost closet space when we moved from my apartment to the condo. I gave the girls the master bedroom when we moved into the condo, since they outnumber me (and also there's a lot more sunlight that comes in the smaller bedroom- great for morning person me but not for preschool children who fight naps). I tried for a while to keep some of my clothes in the giant armoire I have on the other side of the room and in bins under my bed, but I hated walking around the room just to assemble one outfit, and I really wanted to use the armoire to hold other things. So I started playing with different solutions. 

After I updated the girls' closet (that was another awesome transformation- read this post and this post to see that one), I had extra bins leftover from their old closet. I also re-organized the girls' toys in the basement playroom and was able to bring the IKEA Expedit shelf that used to hold toys up to my closet. Although it wasn't pretty, I was able to use those "leftovers" to play around with where I could keep different clothes and figure out what I wanted. 

I initially thought I would like the idea of bins turned sideways, like the red and green ones you can see on the floor in the "before" picture, because then there are no drawers to open and I could easily find what I need. I quickly discovered that, if I maximized the space in each bin (which I need to do with the smaller closet space), it was too hard to keep everything organized and contained. That's when I switched to thinking about drawers, but I wanted to have all the different types of clothes separated like I did in the smaller bins, and most sets of shallow drawers I found were too expensive (at least in the quantity I would need) or too bulky.

Then I took a trip to IKEA and all of my problems were solved (how many times have I said this? A LOT, people, a LOT):


I picked up two things at IKEA that completely transformed my closet: these ALGOT metal mesh basket systems, and these blue SKUBB fabric bins

I seriously lucked out with the metal baskets: they fit perfectly inside my closet, just barely allowing the doors to close in front of them, they are the perfect height so they stay under my hanging clothes, and they were just recently released and on sale when I went to the store. They had a few different combinations, including taller frames and deeper bins, but these were perfect for that space.

TIP 1: SHALLOW DRAWERS ALLOW FOR BETTER SORTING


I was able to fit all of my non-hanging tops and bottoms into these drawers! For leggings and shirts that don't wrinkle, I rolled each one up and put them side by side so I could see each one without having to sort through a big stack. That freed up enough drawer space so that the rest are stacked just 2-4 items high, so I still don't have much to sort through to find what I need. Each drawer is sorted by type (long sleeve/ short sleeves/ etc).

TIP 2: ROLL UP CLOTHES THAT DON'T WRINKLE SO YOU CAN SEE EVERYTHING

I was pretty excited about the particular fabric bins- probably more excited than one should be about such things- for 3 reasons: they fit perfectly in the Expedit shelves to maximize the space, they have a vertical handle on the front which makes them easier (in my mind) to pull in and out, and the color matched my other room decor. 

TIP 3: USE BINS THAT MAXIMIZE CUBE STORAGE SPACE


Inside the bins I actually re-used some of those old bins again:


They are perfect for dividing up the large bins into smaller ones so I can keep two different types of items in the same bin without them getting mixed up! I may eventually find something that fits the boxes a little more completely so I can use the full depth of the bins, but for now this works perfectly and everything fits!

TIP 4: USE SMALLER BINS TO DIVIDE LARGER ONES

The final touch actually came from another store I love: Michael's. I found the small chalkboard hanging signs on clearance and I knew I couldn't beat that price (or those colors, which again fit in so nicely with the rest of my room!) so I went ahead and got them, even though they are a little bigger than I initially was thinking of getting.

TIP 5: USE LABELS TO KEEP TRACK OF THE CONTENTS OF YOUR BINS/DRAWERS


I did have to do a little surgery on these little guys to make them work. First I cut the twine on one end, threaded the twine through the handle on the bin and back through the hole on the label, then tied a knot to keep it attached to the bin. To keep them attached at the top of the bin (instead of hanging down at the bottom, where they get in the way when you pull the bin in and out), I stapled the twine to the handle. So far it had held up perfectly! I used my trusty chalk marker to label each bin. I love this because if I ever change my mind and move clothes around, I can easily re-label the bins without removing the label itself.

I hope you found some helpful tips to help you get your closet more organized! What are your favorite tips for organizing your closet? Leave a comment! :)

Want more? Subscribe here to the Organized Chaos newsletter and get music teacher ideas and resources for home and school sent straight to your inbox!

Monday, March 7, 2016

DIY family initials (washi decor)

Last week I shared the latest update in my girls' closet, with each of their initials hung on the wall on their side of the closet so I can quickly see whose clothes go where. Today I wanted to show you this quick project to decorate those wooden letters you can find at most any craft store and use them as decor, wall hangings, and/or labels to indicate different members of the family. If you have a stash of washi tape like me, you can decorate these for free and it is so easy to do (and if you don't have any yet, maybe this is your excuse to go get some....just sayin').


First of all, there are so many ways you can use these in your home (and I'm already thinking about adding some more in other places!). You could spell out words, like your last name, "family", "love", or other relevant words and phrases, and hang them on the wall. You could label where each person's shoe box is, where each child should hang their backpack, or even label each bedroom by hanging their name or initials on the door. I actually used to use these letters (pre-decoration) to hold the girls' hair clips in the bathroom by hanging a ribbon from the bottom of each and attaching the hair clips to the ribbon. They're so fun, cheap, and easy, and they look great!

So now let's talk about how to make them!

Step 1: buy some letters somewhere.
I got mine on clearance at Babies R Us a few years back, but they also have them at Walmart, JoAnn Fabrics, Michael's, and lots of other places. They usually aren't more than a couple of dollars, and you can often find them on sale like I did for much cheaper.

Step 2: pull out all of your washi!
Now, of course, you could certainly decorate the letters with other things you might have like paint, ribbon, fabric, paper, or markers. But I love the way these letters came out with washi tape! I pulled out every roll that I own and chose every tape that had purple for the L and all of the ones with green for the S. If you are using these to label different family members like I did, color-coding is a great way to make things even easier to see. I've been using those colors for my two girls since before they were born, so I already associate each of them with those colors.


Step 3: lay strips of tape straight across the letters
I left some edges hanging off on either side and put the tape on straight across, each one lined up right above the previous one, until I got to the top. Once I ran out of different tapes I repeated the tapes until I got to the top of the letter. I tried to mix up the multi-colored ones, patterned ones, and plain, solid ones, as well as mixing up the different widths of tape, so it would look more eclectic.


Step 4: cut off the edges with an exacto knife
The final step is to cut the edges of the tape in line with the edges of the letter! Obviously, the S was a lot more difficult than the L. The good news is, if you mess up, it's really easy to take that piece off, put on a new one, and try again! I had to do that a few times but not only is it quick and easy, a small piece of washi is so cheap I don't have to feel like I'm wasting money if that happens.

Step 5: hang or display your creation!
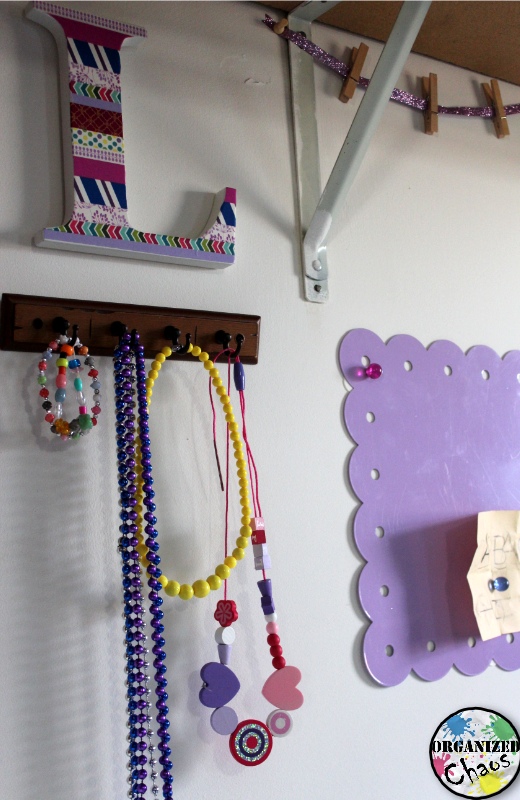
I used command strips to hang mine up, but there are plenty of ways you can display these. Combined with the magnet board, clothespins, and hooks, I think they look pretty cool on the wall! :)


Yet another reason to buy more washi, guys. If you haven't fallen in love with the stuff yet, what are you waiting for?!? Let me know if you have done something like this before, or decide to try it out!

Monday, February 29, 2016

functional wall art for kids (closet update)

A few weeks ago I shared an update on my preschool-age daughters' closet in our new house. Today I'm back with another update because I am just so excited with the way this latest update came out! I think something like this would be a perfect addition to any kid's bedroom, no matter their age.


So, just to refresh everyone's memory, here is what the closet looked like in my last update:


I had gone back and forth quite a bit on where I should keep the girls' dress up clothes, and had decided that, since their closet was so big anyway, I would keep them there with the rest of their regular clothes. But after a couple of weeks I realized that they weren't getting used very much there, so I moved the costumes. This left a huge, blank wall in the middle of their closet, and it looked, well, empty. My other problem was that I was having a hard time keeping track of which girl's clothes were on which side of the closet. When I was putting clothes away, I was finding that I was having to open bins to try to figure out whose clothes were inside in order to know where to put their clean clothes. The third idea/problem that I had in the back of my mind was that I wanted a place for the girls to keep some of their own things that they choose to put up on the wall now that they are older. I have always had their artwork and photos up on the walls, but they didn't really have a place where they could put things up themselves. Out of these three problems, the new wall setup was born!


I had the big, white letters S and L from our old apartment. I had found them on clearance one time and used them to hold the girls' hair clips. In the new house I am using a different system for hair clips, so I decided to decorate them and use them to indicate whose stuff is on each side (S and L are the first letters in their names). I decorated them with washi tape using the colors I have used for each of them since before they were born- purple and green- and stuck them on the wall with command strips. That's one problem solved!


Of course my initial thought for giving them space to hang up their own things was a bulletin board, but I quickly realized that giving my preschoolers thumb tacks was probably not a good idea. So I started thinking about other ways that they could safely hang things without my help. Next to their initials I tacked up s piece of ribbon and clipped a few clothespins to it. Under the ribbon is a metal sheet that I got years ago to use as a magnet board in the car, which I stuck to the wall and stuck some magnets on the front. They can use both of those spots to hang up photos or small drawings they make. I found a couple of strips of "key hooks" on clearance, so I hung those next to the magnet board for the girls to hang purses, bags, or jewelry.

That's the other two problems solved- the girls have places to hang their own things independently, and the wall looks pretty instead of empty! And now I can tell where to put their clothes with a quick glance.


Do your young children have a place to hang their own artwork in their rooms? What have you used? I am loving this new setup and the girls love it too, so I'm calling this a success!

Monday, January 18, 2016

Mommy Monday: closet organization for preschoolers

As some of you will remember, I moved from a small apartment into a larger home over Thanksgiving. This means, of course, that I get to go back to the drawing board to re-organize everything for our new space! It is both thrilling and exhausting. One of my top priorities has been my 4-year-old daughters' bedroom- I want the girls to feel settled as quickly as possible. Although it is far from done, I made some major changes to their closet organization recently that I want to share with you today. (*update: check out how I made the closet even more functional, and a whole lot more attractive, in this latest post*)


In my old apartment, I used a small hallway closet for the girls' clothes and put everything in bins with a low hanging rod so they could reach everything and keep everything organized on their own. I shared that closet setup in a previous blog post- click on the picture to read more about it. For small spaces, I still think that is a good option, especially for younger children.


When we first moved in, I just stuck those same bins in their new closet, along with the dress-up clothes that has previously been in another closet:


There were a few problems with this setup. 1. It looked ugly, which is a problem since I had already removed the accordion-style wooden doors in front of the closet to avoid pinched fingers. 2. Their clothes take up more space now that they are bigger, and it wasn't all fitting nicely into the bins they had been using. 3. The hanging rod was way too high, and the little rod I had used in their old closet was way too short to use in their new closet.

Enter the trofast organizers! IKEA has always been a go-to, and I had been eying the trofast organizers for a while. They are built so that, besides storing things in bins, kids can climb up them like stairs! After pondering various solutions for their hanging clothes, I realized that this was my chance to finally get some and use them well. They were a perfect fit!


The girls love it. They can easily reach all of their clothes, and they very quickly figured out where everything goes and have kept everything organized on their own with no problems. I certainly wouldn't want them climbing up and down every day, but for the occasional dress it is safe and easy. And it looks so much nicer now!

In case you are interested, here is how we organized each of the bins for their current clothes:


The great thing about these organizers is that they can be used for so many things, if I ever decide to stop using them in the closet, I know we will easily find other uses for them.

How do you organize your preschoolers' closet? Have any of you used the trofast organizers? Leave a comment!