Image Map
Showing posts with label Washi Tape. Show all posts

Monday, January 22, 2018

Fresh Start 2018 Challenge: craft supplies

Welcome back to the Fresh Start 2018 Challenge!

This is week #4 of my weekly series this month to try to give my home life a bit more of a New Year's kick in the pants while dealing with the reality that school is back in session and I do NOT have the time or energy for a full-on deep clean/purge. I'm making an effort this year to find small but impactful ways to make my home a priority during the month of January. So far I've tackled closets, purses, and the car. This week's focus: craft supplies!


If you haven't already, I hope you'll look through all of the "fresh start" posts and maybe get that extra motivation you need to do a little cleaning up! It has been so helpful for me to stay motivated by picking a manageable task each week and keeping myself accountable on Instagram.

It's no secret that I love crafting. I love making things to use or decorate around the house, decorating in my planner, or just creating art for the fun of it (especially with my daughters!). Because of this hobby, I have quite a collection of stickers, washi tape, scrapbook paper, pens, and more. And that's not even counting all the art supplies my daughters have!

This week's fresh start challenge: purge and organize all of the craft supplies!

This is a 2-part process: step 1 will be to get rid of supplies we're no longer using. I know I have some old washi tape I've had for years that is all stuck together and doesn't work. My daughters have old markers that have dried up, tiny pieces of broken crayon, small scraps of paper that never get used, and random stickers from grocery stores and dentists that nobody has touched for months. The first step to giving our craft supplies a "fresh start" is to go through and get rid of all of that! Hoarding isn't helping anyone.

The 2nd step is to get everything that's left re-organized. I have to confess, I have collected enough additional sticker books and washi tape rolls that I need to revisit my organizational system- yikes! I currently have several things just floating around aimlessly in my drawer, which means it's hard to find what I need when I want it, and I often forget about things that I have.

If you're joining me in organizing your craft supplies, you'll want to create an organizational system that works for you and the supplies you have. If you need some ideas, here are some of the systems I've used in the past:


Want to join me in this Fresh Start 2018 challenge? I'm going to be posting a photo on Instagram on Sunday of what I accomplished for the challenge this week. If you want to join me, share your own pictures and include #FreshStart2018Challenge in the description. You don't have to stick to any schedule either- join me any time! The goal is to get a cleaner, more organized home without the guilt or stress.

This has been a great way for me to force myself to set aside some time to clear things out and clean up without feeling overwhelmed. Here's to a fresh start this new year! Click here to sign up for the Organized Chaos newsletter!

Monday, November 6, 2017

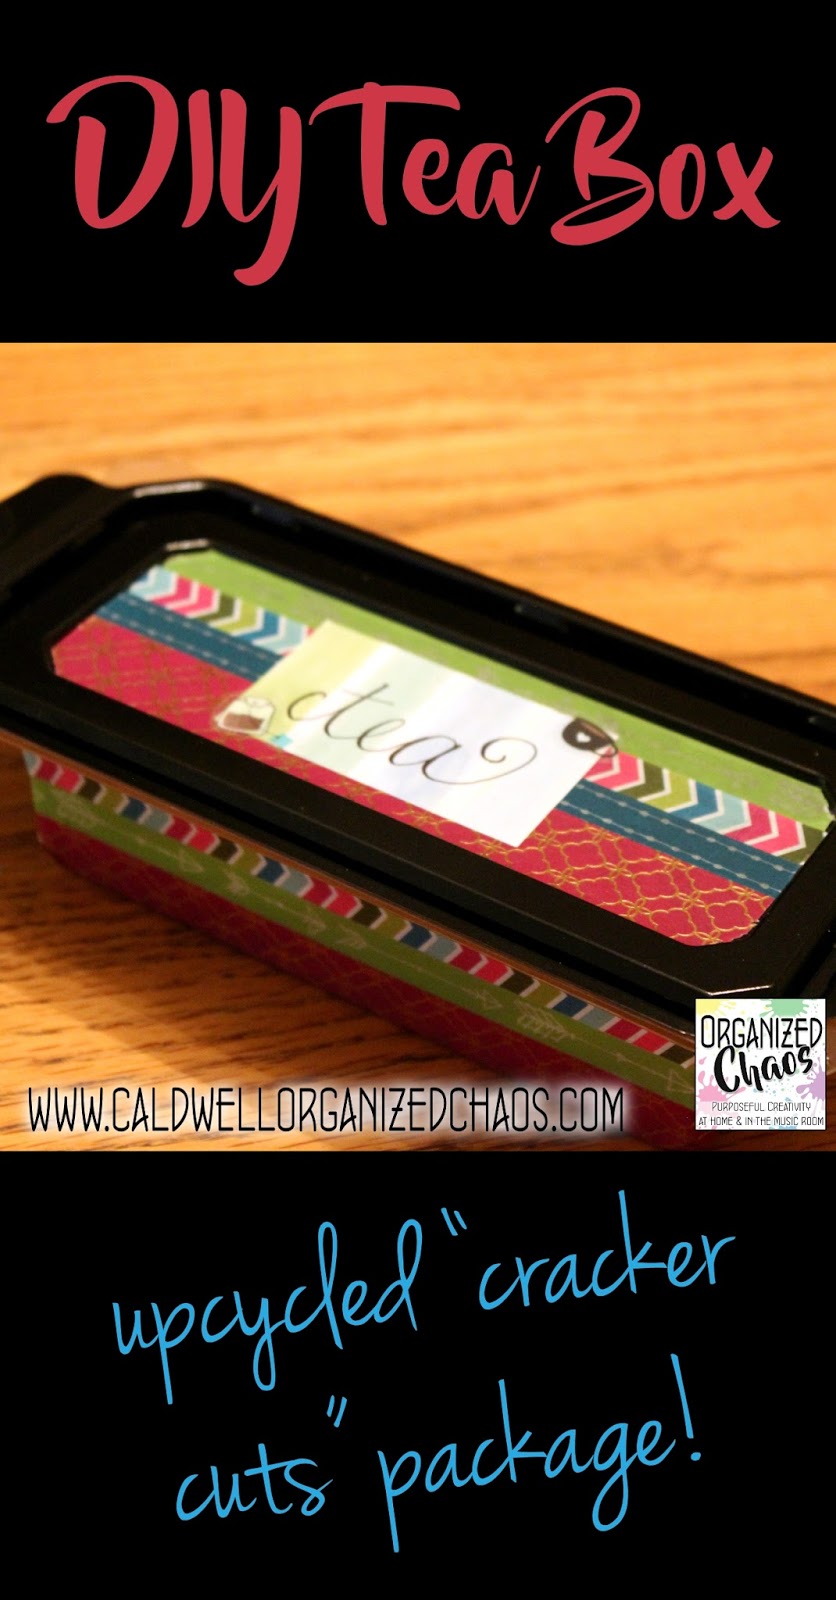
DIY Tea Box

It's been a while since I shared a quick and easy DIY project, so I'm excited to have another fun one to share today that's perfect now that the weather is getting cooler: a DIY tea box! Even better, this is a simple way to upcycle something you would otherwise throw away, so it's a great way to do a little planet saving too :)


I am a hot drink lover. Whether it's hot chocolate, coffee, or tea, I love it all! So naturally I have a bit of a tea collection in my pantry. That's all well and good when it's just me, but when I have guests over it can be pretty cumbersome (and overwhelming) to pull out 10 different boxes just to offer them a drink! This tea box solves that problem.

Another thing I love are those "cracker cuts"- cheese that is pre-cut into squares. They are so easy to pack in lunches and they're great to put out as a no-fuss appetizer or a quick snack after school. So I started accumulating these nifty long, rectangular plastic boxes that the cheese came in- I knew there had to be a way to reuse them!

Turns out, they are a great size for tea bags:


Besides the nice shape, these boxes also have a pretty good seal on the lid, so I can keep some of those tea bags that aren't individually packaged in there too- I just cut out a piece of the box so I know what type of tea it is, and stuck a few of each tea behind the cutout.

Honestly if you don't care about aesthetics, you could just rinse out the box, flip it over, and throw some tea bags in there. But of course I wanted mine to look a little more fun, so I cleaned off the original label and stuck some washi tape around the outside and on the lid. I put a few stickers on the top to write the word "tea" on the lid, and that's it!

I'm happy to have this little box on hand for the next time I have people over! Now to find some people to invite...... ;)

Join the Organized Chaos family- sign up for the newsletter right here!

Monday, July 31, 2017

Craft Supplies for Home Decor: Washi Tape

Raise your hand if you've ever used craft supplies as home decor! I've found that many craft supplies are also perfect home decor items- they're generally cheaper than buying pre-decorated items, there are infinite color and pattern possibilities, and in most cases they're easy to change out if you're renting (or just flaky). Plus if you're like me and already have a craft supply obsession, this just gives you another excuse to buy more pretty things! ;) Today I'm kicking off a series on using craft supplies in the home with my favorite item: washi tape!


I've actually shared quite a few ideas for using washi tape in the home already, so I'll share those posts below for you to see more detailed ideas. But the applications are probably pretty obvious: washi tape is a great cheap and temporary way to add colors and patterns to almost any surface. And of course you can use it to attach things to other things, like hanging (light-weight) pictures on the wall. Click on the images below to see some of my favorite projects:

Disclaimer: some of these posts are OLD! No judging my beginner photo skills from years ago! ;)


Washi Tape Gallery Wall:

Mail Sorters:

I hope you found inspiration for some new home projects! How else have you used washi tape in your home? I'd love to hear your ideas in the comments below!

Stay in touch! Sign up here for the Organized Chaos Newsletter and I'll send more ideas and resources straight to your inbox.

Tuesday, June 27, 2017

Functional Decorating for Teacher Planners

Planner decorating for teacher planners can seem like a frivolous concept, but when it's done right, it can not only make lesson planning more fun and colorful, but also more effective. And it doesn't have to be time-consuming or expensive, either.


I'm totally in love with paper planning, and I love using my teacher planner as a creative outlet. But even if you're not a scrapbooky-creative type, using a few simple tricks like these can make it a lot easier to organize all of the information in your lesson planner and make it a lot easier to find the information you're looking for on the page!


If you're interested in streamlining your lesson planning and making it more effective, be sure to check out my free email course, Lesson Planning Made Awesome. Click here to learn more and sign up!

Do you use any "decorations" in your teacher planner? What are you most eager to try out? I hope you found a few new ideas to inspire more functional AND fun lesson planning! :) Want more? Sign up for the Organized Chaos Newsletter right here to get more ideas and resources sent straight to your inbox!

Monday, September 5, 2016

The Family Calendar: a fun family project

Last November I shared the new family calendar that I was planning on using with my daughters, and how I wanted to use it. Although I still love the ideas that I had at the time, in reality I wasn't able to keep up with it like I wanted (I had planned to print photos from the month and use it as a scrapbook- I just haven't been able to keep up with printing pictures to use etc). Instead, the blank calendar that I made for that purpose has become a monthly family activity that is not only fun but helps the girls anticipate the upcoming events in their lives. Read on to see how easy and fun a family calendar can be (and there's a free download link if you want to make your own blank calendar to use this way)!


As many of you know, I am a planner girl. My planner not only allows me to maintain sanity as an elementary music teacher, single mom, co-parent, and blogger/entrepreneur, but it also is my hobby. I have always loved scrapbooking since I was little and I love using colorful (albeit cheap and still mainly functional) craft supplies to decorate my planner (you can see some examples in my "plan with me" videos on my YouTube channel). 

Although I tend to save my planner time for when I have the house to myself, the girls have figured out that it is something I love to do. One day it occurred to me that it would be fun to do something like I do with my planner together as a family project, so I let the girls pick out some washi tape, stickers, and pens from my craft supplies and we decorated the page together, labeling all of the events that applied to their lives like birthdays, field trips, and other family and school events.

I've been so happy with the results! It is so much fun for me to share my hobby with my daughters, and I love seeing my little mini planner girls choosing coordinating items from my stash and deciding where things should go. 


Besides being a great opportunity for family bonding, the calendar is very helpful for the girls to see when things are coming up now that they have a better sense of time (they're now 4.5 years old), especially for one of my daughters who struggles with transitions and thrives on structure. And, as it turns out, it is still going to (sortof) serve the purpose I intended as a way of memory keeping- the pictures they draw and the stickers they use will be so much fun to look back on as the years go by!

This is a great way to combine quality time with the whole family, monthly family meetings to go over the upcoming month's events, and art projects all rolled into one. Have you ever considered something like this for your family? There are so many benefits to this project that I had to share! If you want to make your own, you can download a free copy of the same blank calendar I use here- I'll be updating the calendar for free each year so if you want to make one for next calendar year, you can re-download towards the end of the year.

Want more? Subscribe here to the Organized Chaos newsletter and get ideas and resources for home and school sent straight to your inbox!

Monday, July 11, 2016

planner supply storage and organization

I spend a lot of quality time with my planner in the summertime. I first reflect on what pages I used and didn't use in my planner last year, and what pages I wish I had or wish were set up differently to decide what pages I want to include in my planner this year (see a quick tour of my planner for next school year here). Then I print the pages out and get everything set up (see this year's planner setup, with links to everything I use, in this post). Then of course I get to start filling it out! My planner helps me so much in keeping me sane, I think it's only fair for me to show it some love too ;)

This past school year I started getting into using more supplies to use my planner more effectively (and make it prettier / more fun). As a crafter I already had some supplies on hand that I use in my planner, but my collection has definitely grown! I recently re-organized my planner supplies to make it easier for me to find what I need, so I wanted to share those ideas with you today.


After re-organizing my closet, I was able to clear out the 3 drawers in the armoire I have in my bedroom for planner / crafting supplies. The top drawer has all of the supplies I use most often in my planner, including washi tape, sticky notes, stickers, stamps, glue, and scissors:


The biggest organizational challenge was, of course, the washi tape. About a year ago I made myself a washi tape dispenser, which looked like this (click on the picture to see how I made it):


Although it served me well, and I would definitely recommend it to anyone who has a decent but not crazy amount of washi tape, I needed a new storage solution for two reasons: 1) I accumulated too much washi tape to fit in the dispenser and 2) I found I often wanted to hold the entire roll in my hand rather than rip a piece off of the roll from the dispenser. So when I started organizing my supplies in my drawers, I decided it was time for a change.


All I did was take an old box I had on hand, cut off the lid, and arranged the tape rolls in rows. In order to keep the rolls from rolling around the box, I cut strips from the lid and stuck them between the rows of tape. As you might have noticed, my tape didn't even all fit in this 8.5x11 box (I know, I *might* have a problem) so I just found another box and did the same thing, except I only needed one row so I just created one "divider" from the lid and use the rest to store stickers:


I arranged my sticky notes and page flags along the back of the drawer, which both allows me to find them easily and also keeps the boxes, which don't quite fill up the length of the drawer, from sliding around. You may notice my re-purposed washi dispenser in the corner- that now holds my other basic supplies, like scissors, glue, and stamping stuff, and I also use it as a caddy if I'm taking my planning to another room- I pull out the washi, stickers, etc that I want to use that week, throw them in the box, and I can easily carry everything wherever I want to go!

The second drawer holds all of the other planner supplies that I use less frequently and/or are too big to fit in the other drawer:


Right now I have extra pens, stamps, and ink pads, white out, my hole punch, paper cutter, and supplies for setting up my planner (which I only need to use once a year) like tabs, pen loops, and pockets.

Below that I have an entire drawer just for my paper pads:


In my defense, this collection has been growing since I was in high school, and I use the paper for all kinds of different projects besides my planner. Paper stacks are an easy and cheap way to decorate all sorts of things!

There is one set of supplies that I keep on my desk instead of my armoire:


To be honest I did this mostly because I had these mason jars left over from a baby shower I hosted a few months back and I didn't know what to do with them! The jars full of brightly colored pens are just as much decorative as they are functional :) It is nice having the pens out and handy though, since I use them more than any other supply on a regular basis.

If you're interested in seeing a round-up of my favorite planner supplies, here's a post I wrote last November:


And if you're wondering what kinds of pens those are in my mason jars, stay tuned for tomorrow: I've recently found some new pens that I absolutely adore so I'll be sharing those in more detail in tomorrow's post :)

Want more? Subscribe here to the Organized Chaos newsletter and get music teacher ideas and resources for school and home (and planning) sent straight to your inbox!

Monday, March 28, 2016

DIY switch plate washi decoration

I'm back with another use for washi tape, and this one is so quick and easy but still adds a great touch to any room's decor: decorating light switches!


I cannot take any credit whatsoever for this idea. I saw this pin years ago- I actually think it was one of my my very first pins ever- and thought it looked so simple but so pretty! Aaaand then I never did it. Now that I am in my new house and trying to commit to making my own bedroom look nice (instead of letting it turn into a dump like my last apartment), I was reminded of the project.

This seriously took less than 5 minutes, guys. All you have to do is use a screwdriver to unscrew the plate from the wall, then tape strips of tape all along the front, letting a little bit go back into the inside so you get nice neat edges. You can go horizontal, vertical, or even diagonal. And you can get the same effect with 2-3 different kinds of tape- you don't need to use tons of patterns like I did. I happened to fall in love with this set of washi, and since they were already created to be together it was easy to use them all together for this project.

Once you have all of the tape on, you just need to cut out the holes for the light switch and screws. An exacto knife will work wonderfully, but I honestly just used the tip of a ballpoint pen to poke through the tape and it worked just fine. If the edges aren't perfect you can wrap the tape around the inside again. Screw it back onto the wall and you're done. Isn't it lovely?


Washi tape really is a busy / lazy / cheap decorator's best friend. If you want to see all of the ways I've used washi in my home, planner, classroom, and more, check out these posts. One of my favorites is the washi tape gallery wall in my last apartment- I'm working on recreating it in my new house (more on that another time!). And if you try this project in your own home let me know- I'd love to see yours as well! This would even be cute in a classroom- I have some music note washi tape that would be perfect in my music room!

Want more? Subscribe here to the Organized Chaos newsletter and get music teacher ideas and resources for home and school sent straight to your inbox!

Monday, March 7, 2016

DIY family initials (washi decor)

Last week I shared the latest update in my girls' closet, with each of their initials hung on the wall on their side of the closet so I can quickly see whose clothes go where. Today I wanted to show you this quick project to decorate those wooden letters you can find at most any craft store and use them as decor, wall hangings, and/or labels to indicate different members of the family. If you have a stash of washi tape like me, you can decorate these for free and it is so easy to do (and if you don't have any yet, maybe this is your excuse to go get some....just sayin').


First of all, there are so many ways you can use these in your home (and I'm already thinking about adding some more in other places!). You could spell out words, like your last name, "family", "love", or other relevant words and phrases, and hang them on the wall. You could label where each person's shoe box is, where each child should hang their backpack, or even label each bedroom by hanging their name or initials on the door. I actually used to use these letters (pre-decoration) to hold the girls' hair clips in the bathroom by hanging a ribbon from the bottom of each and attaching the hair clips to the ribbon. They're so fun, cheap, and easy, and they look great!

So now let's talk about how to make them!

Step 1: buy some letters somewhere.
I got mine on clearance at Babies R Us a few years back, but they also have them at Walmart, JoAnn Fabrics, Michael's, and lots of other places. They usually aren't more than a couple of dollars, and you can often find them on sale like I did for much cheaper.

Step 2: pull out all of your washi!
Now, of course, you could certainly decorate the letters with other things you might have like paint, ribbon, fabric, paper, or markers. But I love the way these letters came out with washi tape! I pulled out every roll that I own and chose every tape that had purple for the L and all of the ones with green for the S. If you are using these to label different family members like I did, color-coding is a great way to make things even easier to see. I've been using those colors for my two girls since before they were born, so I already associate each of them with those colors.


Step 3: lay strips of tape straight across the letters
I left some edges hanging off on either side and put the tape on straight across, each one lined up right above the previous one, until I got to the top. Once I ran out of different tapes I repeated the tapes until I got to the top of the letter. I tried to mix up the multi-colored ones, patterned ones, and plain, solid ones, as well as mixing up the different widths of tape, so it would look more eclectic.


Step 4: cut off the edges with an exacto knife
The final step is to cut the edges of the tape in line with the edges of the letter! Obviously, the S was a lot more difficult than the L. The good news is, if you mess up, it's really easy to take that piece off, put on a new one, and try again! I had to do that a few times but not only is it quick and easy, a small piece of washi is so cheap I don't have to feel like I'm wasting money if that happens.

Step 5: hang or display your creation!
I used command strips to hang mine up, but there are plenty of ways you can display these. Combined with the magnet board, clothespins, and hooks, I think they look pretty cool on the wall! :)


Yet another reason to buy more washi, guys. If you haven't fallen in love with the stuff yet, what are you waiting for?!? Let me know if you have done something like this before, or decide to try it out!

Monday, February 29, 2016

functional wall art for kids (closet update)

A few weeks ago I shared an update on my preschool-age daughters' closet in our new house. Today I'm back with another update because I am just so excited with the way this latest update came out! I think something like this would be a perfect addition to any kid's bedroom, no matter their age.


So, just to refresh everyone's memory, here is what the closet looked like in my last update:


I had gone back and forth quite a bit on where I should keep the girls' dress up clothes, and had decided that, since their closet was so big anyway, I would keep them there with the rest of their regular clothes. But after a couple of weeks I realized that they weren't getting used very much there, so I moved the costumes. This left a huge, blank wall in the middle of their closet, and it looked, well, empty. My other problem was that I was having a hard time keeping track of which girl's clothes were on which side of the closet. When I was putting clothes away, I was finding that I was having to open bins to try to figure out whose clothes were inside in order to know where to put their clean clothes. The third idea/problem that I had in the back of my mind was that I wanted a place for the girls to keep some of their own things that they choose to put up on the wall now that they are older. I have always had their artwork and photos up on the walls, but they didn't really have a place where they could put things up themselves. Out of these three problems, the new wall setup was born!


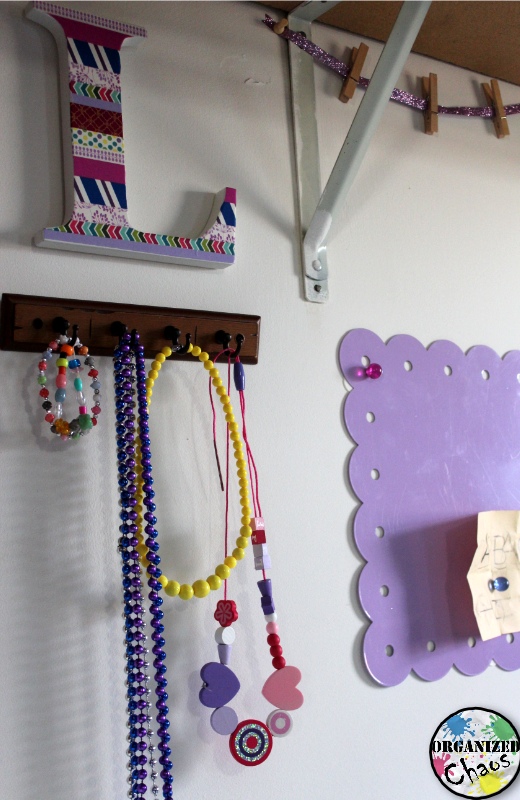
I had the big, white letters S and L from our old apartment. I had found them on clearance one time and used them to hold the girls' hair clips. In the new house I am using a different system for hair clips, so I decided to decorate them and use them to indicate whose stuff is on each side (S and L are the first letters in their names). I decorated them with washi tape using the colors I have used for each of them since before they were born- purple and green- and stuck them on the wall with command strips. That's one problem solved!


Of course my initial thought for giving them space to hang up their own things was a bulletin board, but I quickly realized that giving my preschoolers thumb tacks was probably not a good idea. So I started thinking about other ways that they could safely hang things without my help. Next to their initials I tacked up s piece of ribbon and clipped a few clothespins to it. Under the ribbon is a metal sheet that I got years ago to use as a magnet board in the car, which I stuck to the wall and stuck some magnets on the front. They can use both of those spots to hang up photos or small drawings they make. I found a couple of strips of "key hooks" on clearance, so I hung those next to the magnet board for the girls to hang purses, bags, or jewelry.

That's the other two problems solved- the girls have places to hang their own things independently, and the wall looks pretty instead of empty! And now I can tell where to put their clothes with a quick glance.


Do your young children have a place to hang their own artwork in their rooms? What have you used? I am loving this new setup and the girls love it too, so I'm calling this a success!

Monday, July 27, 2015

Mommy Monday: DIY washi tape dispenser

It should come as no surprise to my faithful readers that I love washi tape. I use it to hang pictures, label things, and of course in my planner. I always admired with envy the beautiful dispensers and displays that people had for their washi tapes- they just looked so pretty and organized, and seemed to make it so much easier to find and use the tape that they had! But I just could not bring myself to spend money buying something that, realistically, is not at all necessary, and the homemade ones all involved woodwork. So I sighed at the beautiful pictures and moved on. Then one morning I pulled out one of my straws (which had come as extras with some old water bottles the girls had and are made of thick plastic) to use in my coffee and I realized they were the perfect shape to hold rolls of tape! No wooden dowels needed! And thus, my completely free and does-not-involve-any-woodworking DIY washi tape dispenser was born :)


*sigh* Isn't it beautiful?!? It makes me happy just looking at it! Let me show you how I made it- it honestly took about 10 minutes to make!

Supplies: I used two of those thick plastic straws, a piece of scrapbook paper, scissors, double-sided tape, a wooden box (that used to hold my girls' bead set that they got for Christmas), and of course, washi tape.


I was lucky to have the wooden box on hand. When I consolidated the girls' toys and organized them, I kept a couple of the original containers because they were just too nice- I just KNEW I would find a way to use them! I still have one more nice wooden box sitting in my closet waiting to be used, but I'm glad I found a use for this one! Both of them were from Melissa and Doug toys, actually- they package their things very nicely :) So before I started, I checked to make sure the straws were long enough to go across the box (they were). I could have just used the box as-is and it would look perfectly fine, but I decided to make it a little more fun with some scrapbook paper on the bottom. I laid the paper in the bottom and used the highly-scientific method of folding it over at the edge to measure where to cut.


The paper I chose didn't go all the way to the edges on the long side, but that was fine with me because I didn't want to mess with the slanted corners and I knew that part would be mostly covered by the rolls of tape anyway. Since I knew the paper wouldn't be getting much wear and tear, I took the lazy route and stuck it down with double-sided tape.


Once that was in, I needed to figure out how to place my tape on the two straws and fit them all in. What I should have done in this step (but didn't realize until later) was also make sure all of the rolls were facing the right way so that the tape would come off towards the edge of the box.


I decided to put all of the solids on one side and the patterns on the other. Those thinner, solid colored tapes are a great buy if you're wanting to start a stash, by the way- I got them here.

I stuck the straws through the rolls of tape with the ends laying across the top of the box. I had originally thought I would hot glue the straws to the box, but then I realized I wouldn't be able to take off old rolls or add new ones very easily, so I decided to use some of the washi tape to hold the straws. I was a little bit worried about the durability so I put a long strip all the way down each side of the box (it was during this process that I realized I needed to check which way each roll was facing and had to take some rolls off the straws to turn them... oops). I actually have a roll of thin tape with a wood grain look, so I used that one. The only trick was to cut the second piece long enough and put the roll back on the straw before taping it down.


Voila! Once everything was taped down, I just pulled a little piece of tape off of each roll and stuck it to the edge of the box to make it easier to see each tape and easier to grab a piece when I need it (don't you hate twirling the roll of tape round and round in your hands trying to find where the tape starts?!?). The nice thing about this particular box is that it's long enough that I have space in the middle where I can keep other supplies. See how nicely my scissors fit?


So there you go- my DIY washi tape dispenser made from stuff I had on-hand in under 10 minutes. And makes me so happy just looking at it. Do you have a stash of washi? How do you organize yours?

Monday, April 27, 2015

How I Set Up My Planner: 2015-16 teacher and home planner

Guys, I can't even begin to describe how excited I am. I have my 2015-16 planner printed and in my hands!! Although I'm going to be deviating slightly from my usual "Mommy Monday" and "Teacher Tuesday" posts this week, I decided to share these posts in these slots because my planner is THE single most important thing that I use to organize my life at home and at school. So this week both my Monday and Tuesday posts will apply to both Mommy-ing and Teaching :D

I loved the planner I made and used this school year (so much so that my very first post on this blog was all about that planner!). I didn't think it was possible, but I love my new planner is even more!! A lot of the basic format is the same, but I've streamlined the inside, made a bunch of cover designs that all coordinate with the rest of the planner so they are interchangeable, added some new pages, and even figured out how to have laminated tabs! :) I'll be giving you a tour of the inside tomorrow, but today I wanted to talk about how I set it up to make the most of my all-in-one planner.


I have my pages printed on 28lb paper- the rest of the planner creation I do at home. I am still deeply in love with the arc notebooks from Staples. Having the flexibility to move pages around like a 3-ring binder while still laying flat like a spiral-bound notebook is just unbeatable, in my opinion. And because I completely DIY the inside, and use this cheap hole punch from Levenger, it is extremely cost-effective. See how nice it is?


(Side note: the rings in the picture are a little bigger than the ones I regularly use because I'm still using the smaller ones on my current planner.)

I used the same paper tabs as I did this past year. I love the colors and how easy it is to replace if they wear out or you want to change the labels, but they were definitely a bit flimsy. So this year I laminated them! I just used a single-sided laminating sheet. Double-sided lamination won't work for this because you need a complete seal for the lamination to stick and you don't want to laminate over the sticky (and repositionable!) part on the back of the tabs.


I actually use the single-sided laminating sheets for some of my planner pages as well, for things like cleaning checklists that I want to be able to re-use several times, I laminate the page and use a wet erase marker to write on it. The ink comes off easily with a wet paper towel but won't rub off from the other paper. Since the sheets are slightly bigger than the 8.5x11 paper, I had enough space to laminate my tabs on the same sheet, then just cut around the paper and the tabs and voila! I also re-punched the page after I laminated it (which my cheap-o punch handled just fine).

I also have a pen loop and zippered pouch at the back of my planner. I have used both this year and they have held up really well. I keep some blank cards and postage stamps in the pouch, and any time I get a handout in a meeting and don't know where to put it, I throw those in there too. Super handy! The small blue clip in the picture is magnetic. I found some at Walmart on clearance earlier this year and they are awesome! I keep the current month clipped with the current week so I can easily flip back and forth, since those are the pages I tend to use the most often.


Two more things and then I promise I'll stop gushing! :D

You all know how much I love my washi tape. Besides being colorful and fun, it's strong and repositionable- perfect for things that I want to keep in my planner but be able to change out too! I print a copy of my class schedule and district yearly calendar separately and tape them into my planner with washi tape. Inevitably those calendars and schedules tend to change, so this way I can easily change it out when that happens. Plus it adds that little punch of color!

In my recipe section, I have some of these self-adhesive pockets. I keep some of my staple recipes written out on small cards and keep them in those pockets, which are stuck to the pages of the planner. I was unsure of how well they would stay in the pockets, but I have not had any issues with paper falling out this year, so I'm sticking with the same system this year.

That's about it! Putting your planner together is a very personal thing that depends so much on your style, your life, and your needs. Hopefully you got a useful tip or two from my list! I'd love to see and hear how you have "tricked out" your planners as well :) Don't forget to come back tomorrow to see the inside- SO EXCITING!! :D (**updated: check out the complete tour here!)