
Image Map

Tuesday, November 11, 2014

Linkup: Tech Talk Tuesday (DIY Interactive Whiteboard tutorial)

Today I'm linking up with Shelley Tomich at Pitch Hill to share a tech tip with you. I've included the link to the link-up at the bottom of this post, so don't forget to check out all the other fantastic tech tips over there! This tech tip is one that I have shared on this blog before, but is so awesome that is bears repeating: how to make your own interactive whiteboard system for under $50.


Today I'm sharing a tutorial on my biggest school project last year: my DIY interactive whiteboard (aka SmartBoard, Promethean Board etc). I know it sounds crazy to make your own interactive whiteboard, but trust me, it's not nearly as techy and complicated as it sounds, and get this: if you have a projector, this thing will only cost you $50!! That's a lot less than the astronomical amount it would cost you to get a name-brand SmartBoard or other pre-made interactive whiteboard. So it's definitely worth the sweat equity to get it going.

Materials:
1 Wii Remote (like this one)- around $20
1 Infrared Pen (like this one)- $20-$30 depending on the type you choose
Wiimote Whiteboard software (like this one)- free
Computer with bluetooth capability (or you can get a bluetooth dongle here)
Projector (preferably mounted, but not required)

1. Make sure you have a projector and a space on which to project an image. It can be a regular whiteboard, a projector screen, or even a wall (which is what I used- and actually prefer).


Because my walls are pretty old and yucky, I bought some white contact paper and black painter's tape at Home Depot and put it up on the wall where the projected image goes. It is a nice touch that helps define the space for the students, and it makes it easier to see because you can't see the chipped paint on the wall, but it is definitely not necessary.

If possible, make sure the projector is mounted- and if you can't do that, get it as stable and immovable as possible. The less it moves the better. Connect your computer to your projector.

2. Buy a Wii remote and IR (infrared) pen. Use the links above or you can shop around for your favorite type. There are tons of different pens you can get here, as well as several other online options. You could even make your own pen if you wanted, but no need to dive into that unless you are really up for an adventure! :)

3. Download the correct version of the free software onto your computer to match your operating system. If you want to explore all the software versions available, you can check out this site, but I recommend sticking with the one already mentioned.

4. Open bluetooth on your computer. Open the back of the Wii remote (where you put in the batteries) and push the red button until you see the Wii remote appear under the list of bluetooth items on your computer. Your remote is now connected to your computer.

5. Open the Wiimote software you downloaded. Hold down the 1 and 2 buttons on the front of the Wii remote at the same time. You may see some text scrolling in a new window- this is good. Keep holding the buttons. When you see a blue bar appear towards the top of the Wiimote software window showing the battery level, you are successfully connected and can stop holding the buttons.


6. Turn on your projector. Set your Wii remote up somewhere where the black end can "see" the whole projected image- this is the tricky part. You can tape it to the projector, set it on a table, or use a mic stand to point it towards the image. It needs to be far enough away to get the whole screen but close enough to be able to "see" the IR pen. I used a mic stand for several months and ended up mounting it to the ceiling like this:


If you want to use this setup you will need to buy a mount like this. For me it was worth it because of the way my room is set up (sky lights: great for natural lighting, not so great for projector installation), but most people will probably find it easiest to stick it on to the projector itself. Keep in mind that the Wii remote can "see" about 45 degrees on either side.

*You can check to see how much of the screen the Wii remote is "seeing" by clicking on the IR camera monitor and then making the window full screen. Click around in all corners of the screen to see if a dot shows up when you click.
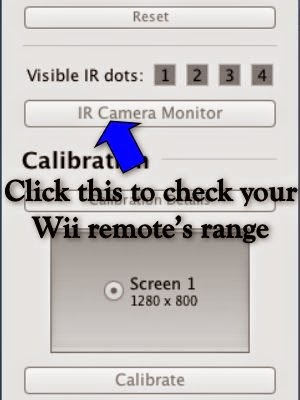


7. Click "calibrate" in the Wiimote software. You will see a bulls-eye on the left top corner of the screen. Click on the center of the bulls-eye with your IR pen. If your remote is positioned correctly, you will see a green check mark. Yay! Now do the same thing in the new bulls-eye that has now appeared on the top left side. You will then do the two bottom corners. If you get green checks in all 4 corners, you are all set to use your board! It is very important that you are careful to click as close to the center of each bulls-eye as possible. The further off your points are here, the more your calibration will be off when you try to do something on your new interactive whiteboard. Take your time! If it's not working, play around some more with the Wii remote positioning. You also need to make sure you aren't blocking the Wii remote from seeing the IR pen with your body. Make sure you stand to the side while you click.


Extras (I use but aren't necessary):
Contact paper/ painter's tape
Gator mount for ceiling or desktops for Wii remote (like this one)
Rechargeable battery pack for Wii remote (available here for $12.99)
Smart Notebook (available here- they have free trials) or other interactive whiteboard software

Getting your own interactive whiteboard definitely takes some trial and error but it is SO WORTH IT. There are so many benefits to having an interactive system in the elementary music classroom, but so few schools that provide their music rooms with the funds to buy a pre-made one. I hope that I can help inspire more music teachers to give it a shot- please let me know if you need any help along the way!

I hope you enjoyed this post. Now go check out the other awesome tips for technology in the music room (including lots of great tips for iPads!) by heading over to the Tech Talk Tuesday linkup:

Picture

Teacher Tuesday: recorder karate part 2- belt storage

Welcome back to Teacher Tuesday! Earlier this year I shared my current system for organizing and storing the students' sheet music for the Recorder Karate program. I've included the link to that post at the end of this one so you can read more about it if you're interested. Today's post is about my new recorder belt storage solution!


Last year I started using loom bands as my "belts" and it was the best.decision.ever. No more cutting little pieces of yarn, no more tying things onto hundreds of recorders, no more running out to the store early in the morning because you didn't know your yellow yarn was almost gone. So much easier. The only tiny problem:


This whole loom band thing happened in the middle of the school year last year, just as I was getting ready to start the program, so I didn't have time to get everything as organized as I would have liked. I went through the whole year last year with the loom bands in the flimsy little plastic bags in which they were packaged, and kept them all corralled in a tissue box with the top cut off (yep.). Not the best way to have quick and easy access to the belt I need when a student completes a test, and not the easiest thing for me to carry around when I am listening to students play for their tests.

Enter the pill box.


Some of you may have seen my Mommy Monday post on how I store my kids' hair elastics:


It wasn't until I wrote that blog post that I made the connection to storing my recorder belt storage- those hair elastics are basically the same thing as the loom bands I use at school! (And this is precisely why I break the "first rule of blogging" and blog about two topics- home and school- because I find so many connections between the two! If nothing else, blogging about both has already helped me come up with great ideas myself!)

At first I was thinking about having 2 of the same round pill boxes that I used for the hair elastics, but I quickly realized that those would also be cumbersome to carry around when I am testing. The next idea I had was to get one of those giant ones with multiple boxes for every day of the week, but I didn't really want something that big. When I was at the drug store, looking for something else, I came across this and realized it was exactly what I needed:


It's so much smaller. It only has 8 compartments, but I really don't need to carry around the white belts because I have my students earn that first belt as a class before I turn them loose on the rest of the belts. Now I have something that fits easily in my pocket, and gives me easy access to whichever color I need:


I'm able to fit about 20 of each color comfortably in this container. I am keeping the rest of the bands in the same tissue box and will replenish in between classes as needed. 

If you want to read about how I organize the sheet music for recorder karate, head on over to this post:


How do you organize your belts for recorder karate? Share your ideas in the comments or head on over to my facebook page to join the conversation there!

Monday, November 10, 2014

Mommy Monday: getting toddlers to eat leftovers- the ice cube tray

I'm sure I'm not the only parent with kids who don't like leftovers. And to be honest, I understand- I remember hating leftovers as a kid. My least favorite meals were when my mom would announce that it was "clean out the fridge day" and she would pull out all the different little leftover things from earlier in the week, sandwich bread, produce that needed to be eaten before it went bad, etc, and told us to take what we wanted. You would think that would be fun to pick different things to eat... But no, I thought it was the worst.

So imagine my surprise when my toddlers had the same reaction to my same meal plan! They really do not like having the same thing twice in one week. Unless it is hot dogs. But those are never left over (because why would you leave hot dogs uneaten?). I digress...

Last week I got off my normal meal plan routine because one of the girls was sick. So I got to the end of the week and realized I had a half-eaten bag of spinach, two untouched bell peppers, and some other random things that I was going to have to throw away soon. Also I had been too tired to prepare anything for dinner before I left for work (yeah OK I guess that was the bigger problem). So I decided to try something I had been meaning to do for a while: 


That's right folks, it's an ice cube tray! Luckily I had just emptied three trays of ice and had the trays sitting clean and empty on my counter already. I had seen this idea for a party a long time ago on Pinterest:

toddler lunch in ice cube tray

It was one of those ideas that I thought, "yeah, that would be really cute if I had hours to sit and chop stuff up and arrange into cute and colorful trays for my kids' party... *sigh*", pinned, and moved on. But if all I'm doing is cleaning out the fridge with random bits and pieces, I figured why not?!?

It was actually a lot of fun to put together. The girls loved helping me pull out anything and everything from the fridge and pantry, and picking out where to put each item on their tray. By the time we finished (took us about 15 minutes total to get them ready) they couldn't wait to dig in! The whole time we were eating they would look around their tray, giggle with excitement, and pick a new item to stuff in their mouth. It was hilarious!


In case you're interested, these are the things that ended up going in our trays: banana slices, spinach leaves, tortilla, cheerios, frozen peas, frozen blueberries, goldfish crackers, canned corn, canned black beans, sliced deli ham, mixed nuts, sweet potato, shredded cheese, yellow bell pepper, and hot dog. Both girls finished most of their dinner.

I think we will be doing this again soon- the girls are still talking about it several days later! What do you do to get your kids to eat leftovers? Share your ideas in the comments!

Tuesday, November 4, 2014

Teacher Tuesday: organizing recordings

Welcome back to Teacher Tuesday! Today I want to talk about how I keep up with all the different recordings I use in my classes throughout the year. There are all the CD's from the district textbook series, tried-and-true CD's I have for movement and other lessons, songs for musical games, recordings of my piano accompaniments for choir and more! Some I use for more than one lesson in more than one grade level, others I only use occasionally, and some I use every year for one very specific lesson.

There are many different ways to organize recordings as a music teacher, but I think the best way to keep track of all the different recordings from multiple sources is to store them digitally and keep all the sound files in one central location (such as iTunes). Over the years I have found some excellent recordings that I still use that are on cassettes, CD's, email attachments, and YouTube videos. It is impossible to keep track of that many different sources and remember where you have what. By converting everything to a digital sound file and storing them all in one place, you at least know where to look when you need to find that one song!

Once you get everything into one centralized, digital location, how you choose to organize your tracks will depend on how you teach and how your brain works. After going through several different organizational systems in iTunes over the last few years, this is the one that seems to work best for me, but you will need to think through and try out some different systems to find the one that best fits your needs.

Basically, I have found that I usually don't have a problem remembering what the track is that I need when I am planning. My main need is having the tracks organized for the day's lessons so that I don't have to hunt for the right track in between (or in the middle of) classes. I use playlists within iTunes that look like this:


Basically I have an ever-evolving playlist for every class I teach. There is one for each grade level, one for each choir, and a few extras for special events (music in our schools month, kindergarten graduation/celebration, townwide/all-district ensemble etc). I also keep one list called "party", where I keep any track I find that works well for music games. Any time the occasion arises, it is nice to have a variety of upbeat songs to choose from that I know will be appropriate. Often I'll let a student choose from the list themselves!

For each class playlist, I store only the tracks I currently need for the lesson I am teaching that day. When the tracks I need change for that class, I delete the old ones and add the new ones in by searching in my master music list in iTunes.


You can probably tell what we are working on in 3rd grade right now! Usually there are only 2 or 3 tracks at most in a class playlist, and I can put the tracks in the order that I will need them in the lesson so I don't have to search for the right track in the middle of class.

I have been using this system for the last 2-3 years and have found that this is what works for me. I know others like to tag different tracks with the concepts they can teach (in playlists or something else), or keep all the tracks for a particular unit in one playlist that doesn't change.

How do you keep track of all of the recordings you need for your music classes? Tell me your ideas in the comments!