Image Map

Tuesday, November 18, 2014

Teacher Tuesday: small percussion storage

Welcome back to Teacher Tuesday! If you saw my classroom tour from the beginning of the school year, you will remember with great rejoicing my wonderful open shelving in my classroom:


While I know most do not have such extensive open shelving in their elementary music classrooms, I want to talk a little bit about some general tips to keep in mind when storing small percussion instruments, which will hopefully be applicable to many teachers in different classroom settings.


So first, let's take a closer look at the shelves in question:


Hmm, not exactly pretty, huh? That's OK. I'll fix that someday with stylish, matching containers. It's on my to-do list (groan). Moving on...

1. Keep larger sets of instruments together in open boxes and baskets.

Keeping sets of instruments, like rhythm sticks and shakers, together is probably common sense. But I think it is important to keep them in open containers, even if you don't have them on open shelves. It's much faster to take out and put away when you're using them in class, students can see what is in each container and how they are stored to put them back, and you can find the right container more quickly too.

2. Keep the instruments used most often by your youngest students at their height.

I used to be more obsessive about sorting instruments by type (metals, woods etc) on my shelves, but I am now a firm believer in organizing things to allow maximum student independence. Think about the instruments that are used most often by your kindergartners (or whatever youngest grade you teach) and put those instruments just below their line of sight where they can easily reach them. I think it is so important to teach students how to take out and put away instruments on their own, so the more you can leave things where they are and have students go get them right from their storage location themselves, the better.

3. Keep those really tempting but less-used instruments out of reach.

This is especially important with open shelving, but no matter where you are keeping your instruments, if you are wanting to foster independence and have students getting out and putting away instruments themselves, you are going to have to protect some of the more fragile instruments. I keep my box of really small percussion, as well as my gong and wind chimes, at the back of the shelf where students can't get to them on their own.

4. Keep everything needed to play the instruments together.

Keep the beaters with the triangles, the sticks with the guiros, and the mallets with the temple blocks. I used to keep all the beaters/unpitched percussion mallets etc together in one container, but that makes the process of getting set up and cleaned up from playing much slower. Keep everything a student needs to play each instrument together so they only have to go to one place to get everything they need.

5. Let students be responsible for their instruments!

Students will never learn how to carefully and properly pick up, carry, and store instruments if they never do it themselves. Encourage independence by storing instruments in view (as space allows) and organize them to streamline the process of helping students find and put back the instruments properly. Yes, it does require more monitoring when idle hands can more easily reach them as well, but it is an important lesson to learn and one that will encourage a community of respect in your classroom as well.

**Update: I've come up with some specific solutions for storing those really pesky but commonly-used instruments that have made a huge difference in my classroom: click here to see my hand drum solution, and click here to see my solution for triangles.**

What are your tips for organizing and storing instruments in the classroom? Leave a comment below! If you want more tips and lesson ideas for other instruments like ukulele, recorder, xylophones, keyboards, and more, head to this post:


Monday, November 17, 2014

Mommy Monday: budget-friendly temporary gallery wall

Gallery walls are a wonderful way to display a collection of photos. I especially love the ones that show family pictures- I think it is a wonderful way to celebrate family. I think it is especially great for children to see pictures of themselves and their family members prominently displayed. It gives a sense of the centrality of those people to their every-day lives.

My problem: I'm a renter. While I normally am a huge fan of command strips as an alternative to nail holes, a gallery wall would take a WHOLE LOT of command strips! So for my small gallery wall I turned to my other go-to: washi tape.


There are so many advantages to sticking your photos directly on the wall with washi tape for a gallery wall effect:

  1. Cheap. You can buy a good roll of washi tape for under $2. I've been using the same 3 rolls of washi tape for a couple of years, on a myriad of projects, and I'm not even close to running out.
  2. Stylish. Because you can mix and match different patterns and colors of washi tape, you can instantly get that eclectic/stylish feel with no effort!
  3. Adjustable. You can peel and stick washi tape many times without losing stickiness (I don't know why. it's the magic of washi.), so if you're not sure what arrangement you will like, just try it and then move things around.
  4. Fast. Just think of how much faster it is to tape a picture to the wall than to put it in the frame and then mount the frame!
  5. Safe. No worries about a kid knocking a frame off the wall!
I recently re-did our gallery wall to include more pictures of extended family. Before I had more pictures of the girls as infants, mostly because I can't get enough of them, but now that the girls can remember their great-grandparents from a visit a month ago it's nice to have those photos to help them remember their relatives and reinforce their importance in our lives.

Have you tried hanging photos with washi tape yet? If you haven't, go do it! Now! ;)

Tuesday, November 11, 2014

Linkup: Tech Talk Tuesday (DIY Interactive Whiteboard tutorial)

Today I'm linking up with Shelley Tomich at Pitch Hill to share a tech tip with you. I've included the link to the link-up at the bottom of this post, so don't forget to check out all the other fantastic tech tips over there! This tech tip is one that I have shared on this blog before, but is so awesome that is bears repeating: how to make your own interactive whiteboard system for under $50.


Today I'm sharing a tutorial on my biggest school project last year: my DIY interactive whiteboard (aka SmartBoard, Promethean Board etc). I know it sounds crazy to make your own interactive whiteboard, but trust me, it's not nearly as techy and complicated as it sounds, and get this: if you have a projector, this thing will only cost you $50!! That's a lot less than the astronomical amount it would cost you to get a name-brand SmartBoard or other pre-made interactive whiteboard. So it's definitely worth the sweat equity to get it going.

Materials:
1 Wii Remote (like this one)- around $20
1 Infrared Pen (like this one)- $20-$30 depending on the type you choose
Wiimote Whiteboard software (like this one)- free
Computer with bluetooth capability (or you can get a bluetooth dongle here)
Projector (preferably mounted, but not required)

1. Make sure you have a projector and a space on which to project an image. It can be a regular whiteboard, a projector screen, or even a wall (which is what I used- and actually prefer).


Because my walls are pretty old and yucky, I bought some white contact paper and black painter's tape at Home Depot and put it up on the wall where the projected image goes. It is a nice touch that helps define the space for the students, and it makes it easier to see because you can't see the chipped paint on the wall, but it is definitely not necessary.

If possible, make sure the projector is mounted- and if you can't do that, get it as stable and immovable as possible. The less it moves the better. Connect your computer to your projector.

2. Buy a Wii remote and IR (infrared) pen. Use the links above or you can shop around for your favorite type. There are tons of different pens you can get here, as well as several other online options. You could even make your own pen if you wanted, but no need to dive into that unless you are really up for an adventure! :)

3. Download the correct version of the free software onto your computer to match your operating system. If you want to explore all the software versions available, you can check out this site, but I recommend sticking with the one already mentioned.

4. Open bluetooth on your computer. Open the back of the Wii remote (where you put in the batteries) and push the red button until you see the Wii remote appear under the list of bluetooth items on your computer. Your remote is now connected to your computer.

5. Open the Wiimote software you downloaded. Hold down the 1 and 2 buttons on the front of the Wii remote at the same time. You may see some text scrolling in a new window- this is good. Keep holding the buttons. When you see a blue bar appear towards the top of the Wiimote software window showing the battery level, you are successfully connected and can stop holding the buttons.


6. Turn on your projector. Set your Wii remote up somewhere where the black end can "see" the whole projected image- this is the tricky part. You can tape it to the projector, set it on a table, or use a mic stand to point it towards the image. It needs to be far enough away to get the whole screen but close enough to be able to "see" the IR pen. I used a mic stand for several months and ended up mounting it to the ceiling like this:


If you want to use this setup you will need to buy a mount like this. For me it was worth it because of the way my room is set up (sky lights: great for natural lighting, not so great for projector installation), but most people will probably find it easiest to stick it on to the projector itself. Keep in mind that the Wii remote can "see" about 45 degrees on either side.

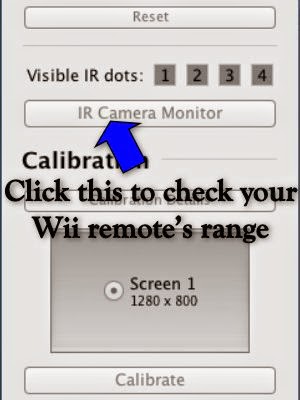
*You can check to see how much of the screen the Wii remote is "seeing" by clicking on the IR camera monitor and then making the window full screen. Click around in all corners of the screen to see if a dot shows up when you click.


7. Click "calibrate" in the Wiimote software. You will see a bulls-eye on the left top corner of the screen. Click on the center of the bulls-eye with your IR pen. If your remote is positioned correctly, you will see a green check mark. Yay! Now do the same thing in the new bulls-eye that has now appeared on the top left side. You will then do the two bottom corners. If you get green checks in all 4 corners, you are all set to use your board! It is very important that you are careful to click as close to the center of each bulls-eye as possible. The further off your points are here, the more your calibration will be off when you try to do something on your new interactive whiteboard. Take your time! If it's not working, play around some more with the Wii remote positioning. You also need to make sure you aren't blocking the Wii remote from seeing the IR pen with your body. Make sure you stand to the side while you click.


Extras (I use but aren't necessary):
Contact paper/ painter's tape
Gator mount for ceiling or desktops for Wii remote (like this one)
Rechargeable battery pack for Wii remote (available here for $12.99)
Smart Notebook (available here- they have free trials) or other interactive whiteboard software

Getting your own interactive whiteboard definitely takes some trial and error but it is SO WORTH IT. There are so many benefits to having an interactive system in the elementary music classroom, but so few schools that provide their music rooms with the funds to buy a pre-made one. I hope that I can help inspire more music teachers to give it a shot- please let me know if you need any help along the way!

I hope you enjoyed this post. Now go check out the other awesome tips for technology in the music room (including lots of great tips for iPads!) by heading over to the Tech Talk Tuesday linkup:

Picture

Teacher Tuesday: recorder karate part 2- belt storage

Welcome back to Teacher Tuesday! Earlier this year I shared my current system for organizing and storing the students' sheet music for the Recorder Karate program. I've included the link to that post at the end of this one so you can read more about it if you're interested. Today's post is about my new recorder belt storage solution!


Last year I started using loom bands as my "belts" and it was the best.decision.ever. No more cutting little pieces of yarn, no more tying things onto hundreds of recorders, no more running out to the store early in the morning because you didn't know your yellow yarn was almost gone. So much easier. The only tiny problem:


This whole loom band thing happened in the middle of the school year last year, just as I was getting ready to start the program, so I didn't have time to get everything as organized as I would have liked. I went through the whole year last year with the loom bands in the flimsy little plastic bags in which they were packaged, and kept them all corralled in a tissue box with the top cut off (yep.). Not the best way to have quick and easy access to the belt I need when a student completes a test, and not the easiest thing for me to carry around when I am listening to students play for their tests.

Enter the pill box.


Some of you may have seen my Mommy Monday post on how I store my kids' hair elastics:


It wasn't until I wrote that blog post that I made the connection to storing my recorder belt storage- those hair elastics are basically the same thing as the loom bands I use at school! (And this is precisely why I break the "first rule of blogging" and blog about two topics- home and school- because I find so many connections between the two! If nothing else, blogging about both has already helped me come up with great ideas myself!)

At first I was thinking about having 2 of the same round pill boxes that I used for the hair elastics, but I quickly realized that those would also be cumbersome to carry around when I am testing. The next idea I had was to get one of those giant ones with multiple boxes for every day of the week, but I didn't really want something that big. When I was at the drug store, looking for something else, I came across this and realized it was exactly what I needed:


It's so much smaller. It only has 8 compartments, but I really don't need to carry around the white belts because I have my students earn that first belt as a class before I turn them loose on the rest of the belts. Now I have something that fits easily in my pocket, and gives me easy access to whichever color I need:


I'm able to fit about 20 of each color comfortably in this container. I am keeping the rest of the bands in the same tissue box and will replenish in between classes as needed. 

If you want to read about how I organize the sheet music for recorder karate, head on over to this post:


How do you organize your belts for recorder karate? Share your ideas in the comments or head on over to my facebook page to join the conversation there!